How to Install Asphalt Shingles
Shingles are an important part of your home that protects you from the elements, and it is also a job you can do yourself. Moreover, if you take on the installation personally, you stand to save both time and money. All you have to do is follow the same steps a pro would, and you can end up with a roof every bit as appealing and effective.
That being said, doing things the right way is vital to adding new shingles or re-roofing your home. The steps are few, but they are important. It starts with preparing the roof, which includes removing the old shingles. Then, you will install the three-tab shingles, followed by the ridge shingles.
Prepare the Roof
Planning and prep work are both necessary to ensure you do not waste time or money later down the line. That includes determining and buying the right number of shingles and measuring the length of the shingles. You will then want to remove the old, tidy things up, and get started on the underlayment and flashing. After that, all that you have left is the installation of a starter course and the shingles.

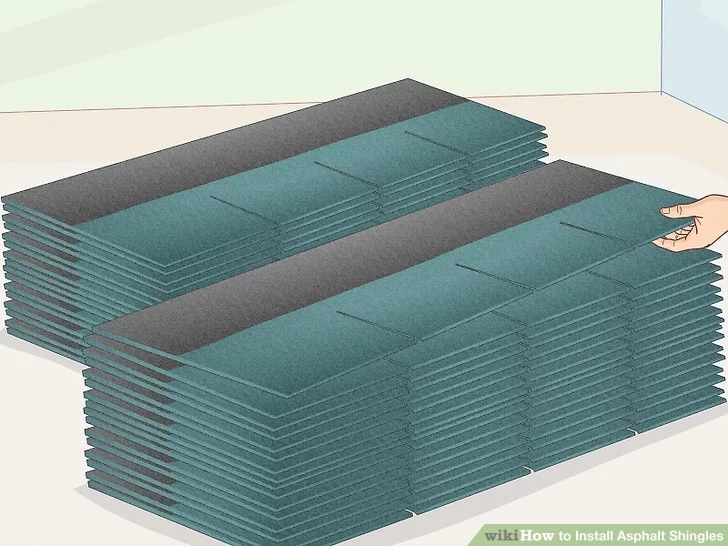
Purchase the Right Number of Shingles
You need to purchase the right amount of shingles to get the job done, which means you need to know the dimensions of your roof. A good rule of thumb is three bundles of shingles per 100 square feet, though you will want to get an additional 10% of materials to cover potential wastage.
Do not be confused about the idea of bundles, which comes from the wooden counterpart. The shingles will come in packages, which you can purchase as you would bundles.
Additionally, while there are more detailed guides to measuring your roof, you can do it quickly by going section by section. First, get the length and width of each section, then multiply them together. Next, add all of the areas together and divide by 100 to get the necessary squares. Finally, multiply that by three to determine the number of bundles needed.
Measure the Shingle Length
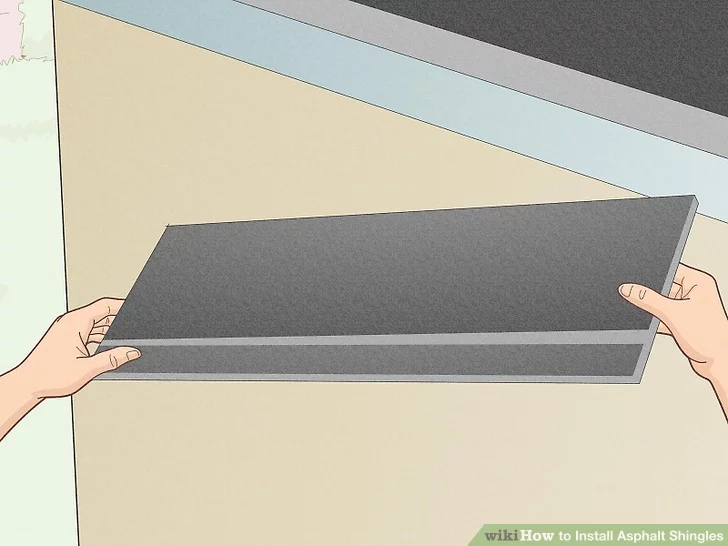
Measuring the length of a shingle after laying it across the roof will offer perspective that will let you know how they are going to go down. A majority of asphalt shingles are around three feet long, and it is unlikely there will be a perfect fit across the roof. That means partial pieces, which means cutting that you need to plan. Additionally, the bottom row needs to be left hanging past the edge.

Remove the Old Shingles and Flashing
Removing the shingles and flashing is an important step that you want to do carefully. It is best to start at the peak, doing so at the corner furthest away from whatever you are using for debris disposal.
Once you pick a spot, use a garden fork or roofing shovel and begin pulling them off. Just make sure that you protect your home while working, such as windows, which could break if you are not careful. Try leaning a piece of plywood against the home below where you are working, which will help you protect the siding and windows.
As for the metal flashing around chimneys, vents, and valleys, it is a good idea to just get rid of it while you are up there working. It is okay to keep flashing that is in good shape, but the majority of roofers will get rid of it and start anew, especially when it comes to the flashing in the valleys.
Tidy the Roof
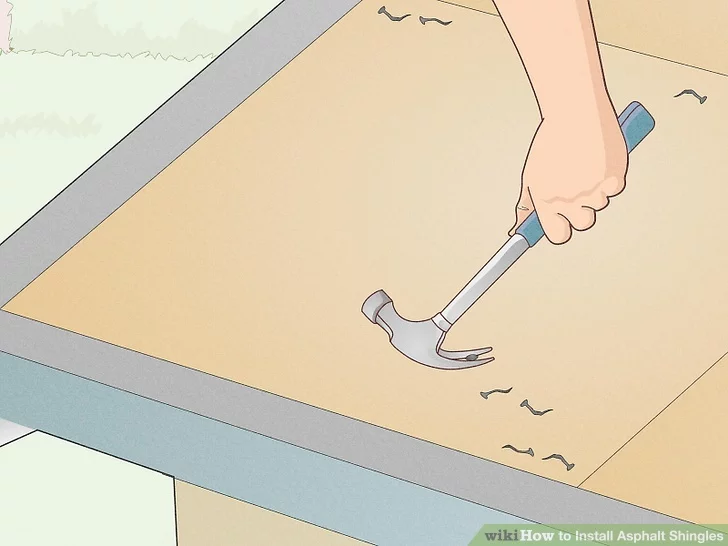
When you were removing the old shingles, you should have been getting all the nails along the way, but if you did not, it is fine. Now is your chance to clean everything up, sweeping the roof and prying up any remaining nails. You will also want to take the chance to take care of loose boards and check for damage, replacing any problem sections.
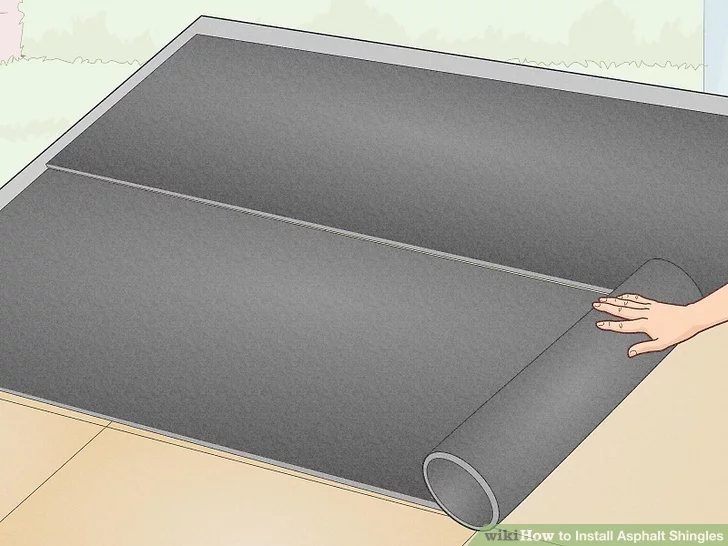
Install the Underlayment and Flashing
There are multiple types of underlayment you can use, including asphalt, felt, and special waterproof underlayments. Common underlayments include 15-pound roofing paper or a self-sealing membrane with a rain screen, but it depends on what you need. Regardless, the installation follows a similar pattern.
Start low and work upward, stapling the underlayment down as you go. Be generous with the staples while being careful to avoid tears. Also, there should be a 3-inch overlap for each row. If there is a chance the roof will experience wind prior to the shingles going down, use “tin caps” beneath the staples.
You might also consider using sticky back ice and water shield in certain areas. Particularly, you want to do this where ice dams and leaf and twig dams are likely. It is also a good choice for valleys where the roof ends at a wall.
At the same time, you will want to put down new flashing, such as a drip edge, which runs along the bottom edge of the roof deck. Rake edge flashing for the sides of the roof is also necessary. Lastly, take care of the flashing around each chimney and wall, known as step and turn back flashing.
Decide on a Starter Course
The starter course gets you started, and there are a few ways to go about it. One option is purchasing starter shingles, but you can also cut your own to suit the project. The latter allows you to purchase a single type of shingle, though it is not quite as easy as the pre-cut variety.
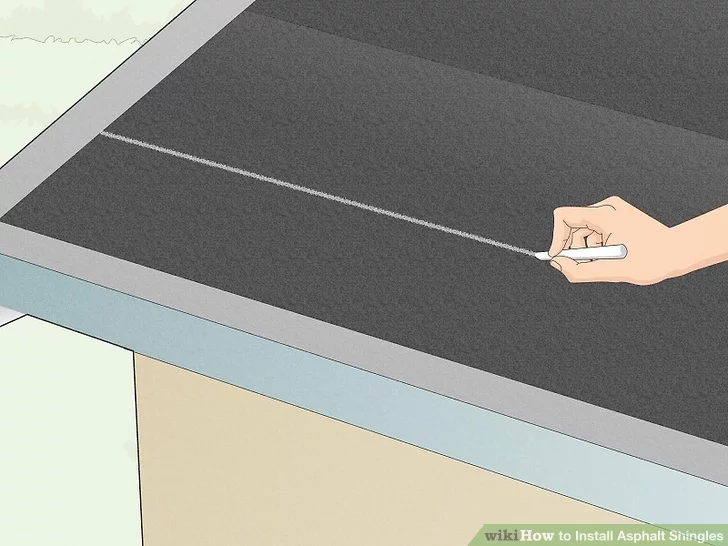
Mark Out a Guide Using Chalk
With your starter course decided, get chalk to mark out a guiding line. While this is not a mandatory step, it can be helpful to mark a line beginning seven inches from the bottom of the roof, though the exact distance will depend on the roof and shingles.
Mark from edge to edge, creating lines that will be visible above each course, acting as guiding lines. Create more lines based on shingle width through a minimum of four courses (rows) across the entire roof.
Install Three-Tab Shingles
With all of the prep work out of the way, it is time to begin laying down shingles. While the process has a bit of involvement, it is not difficult once you have a grasp on it. It all starts with the starter shingles, followed by cutting shingles for staggering slots. From there, all you have to do is lay down each course and cut any excess material.
Take Care of the Starter Shingles
As previously mentioned, there are a few ways to go about dealing with starter shingles. One method is cutting shingles to size, which creates starter shingles by removing the tabbed portion from the three-tab shingles you are using. Once that is done, the shingles can be used as your starter course, which is just the bottom row.
There is still some prep to do, though, which is shortening the first starter shingle by six inches (half a tab). After it is ready to go, place a glue strip along the drip edge and rake edges. Other shingles will go atop the starter shingles, making the first row doubly thick.
Another way to take care of the starter shingles is simply turning the shingles for the starter course, facing the tabs up instead of removing them. While this removes one step, you still want to cut half a tab away to prevent the slots from lining up and exposing the underlayment.
If using shingles without tabs, you will want to nail them down. After, use asphalt cement, dotting beneath the edge of the shingles along the drip edge. The use of dots instead of a single line is important since it prevents moisture from being trapped beneath the roofing. Then, once the cement is in place, press down.
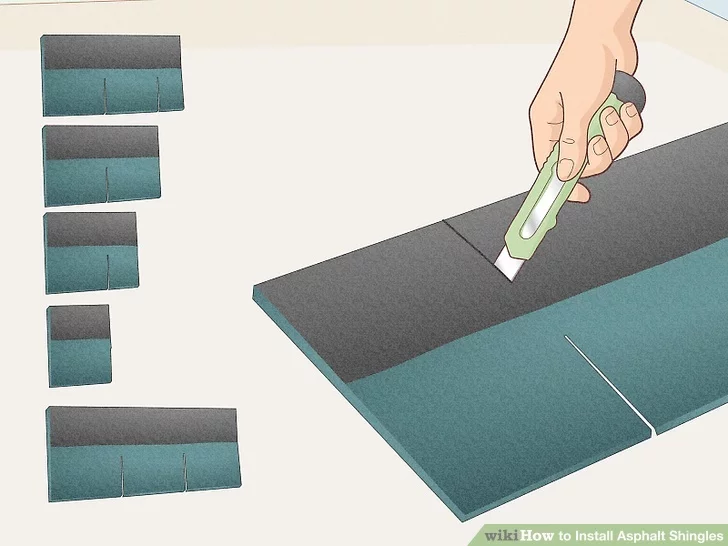
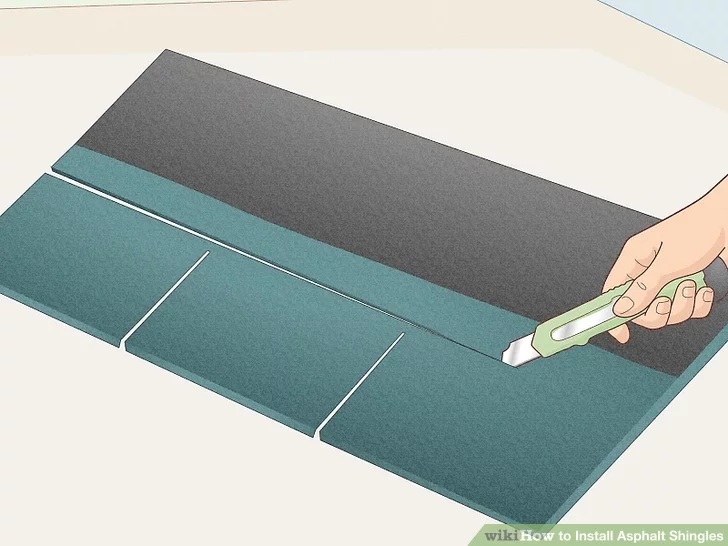
Cut Shingles for Staggering
Staggering the slots is necessary to protect your roof from the elements. It is best to cut multiple sizes using the three-tabs to ensure you have everything you need, starting with cutting half of a tab for the first course. After that, all of the cuts help in shifting the slots by half of a tab, preventing them from lining up with those above and below.
Following the pattern, your first course will have half of a tab removed, while the second will have a full tab removed. The third and fourth courses will have one and a half and two tabs cut off, respectively. For the fifth, you will cut off half of a tab from the last tab. The sixth will remain completely intact.
While it might seem like a lot of wasted material, the good news is that it can be used elsewhere, such as the single-tab cuts for the ridge cap shingles.
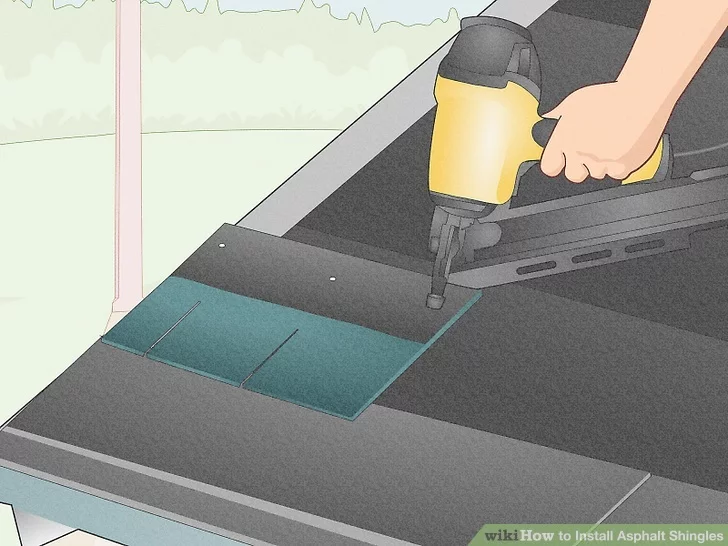
Lay Down Shingles
Each course (row) is about the same, starting with you laying down the cut shingle around six inches from its lower edge. You then hammer in a nail two inches from each end, followed by nails one inch above every slot. Keep in mind that the nails should never hit the tar strip.
By doing things this way, the shingles above will cover the nails by around an inch vertically. The end nails should also be covered by around half of a tab horizontally. Just be sure that the nails hold the top edge of the row below.
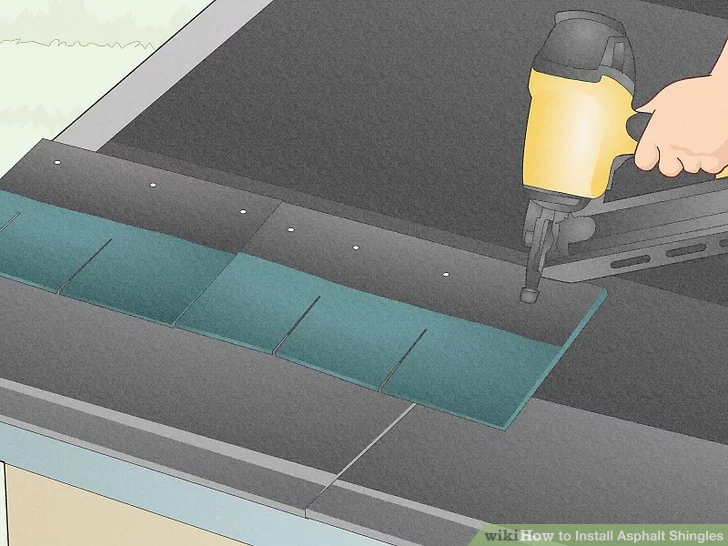
With the cut shingle in place, you can start using full shingles, placing them edge to edge and nailing them into place. Use the same method of nailing as you did for the starter course, following the chalk line for guidance to keep things straight.
When nailing shingles using the method of one at each end and one above each slot, you will come out with four per shingle. However, when facing windward, using six nails is a better choice. In fact, some local codes will demand six on every side, so it is not a bad idea to do it regardless.
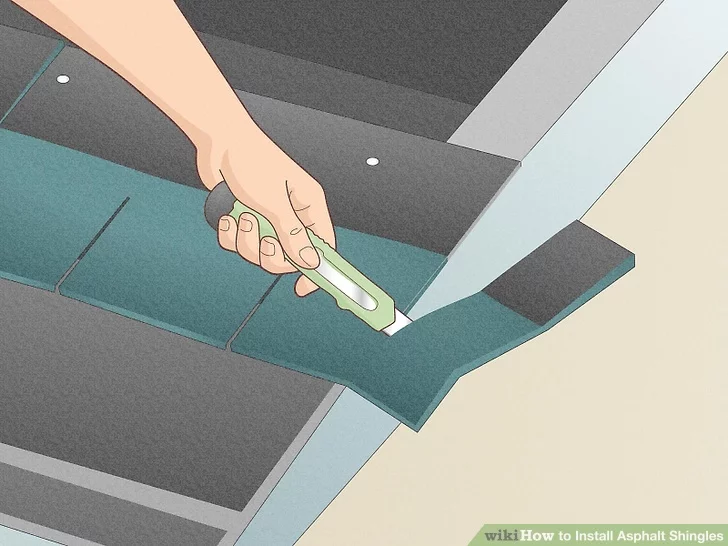
As you lay down your shingles, you might notice they do not fit perfectly on the roof. When you reach the opposite end from where you started, it is likely there will be overhanging material. Simply nail the shingle down and then cut the excess material, making sure it is nice and neat before repeating the process on the next row.
One exception for cutting the excess material is if you are dealing with a hip roof. If you are, leave a tab of overhang at the hip to strengthen the joint.
Install Ridge Shingles
Once you have installed shingles from the bottom to the peak on both sides of the roof, you still need to install the ridge shingles. That means putting down the last course, installing the ridge shingles, and applying a layer of asphalt cement.
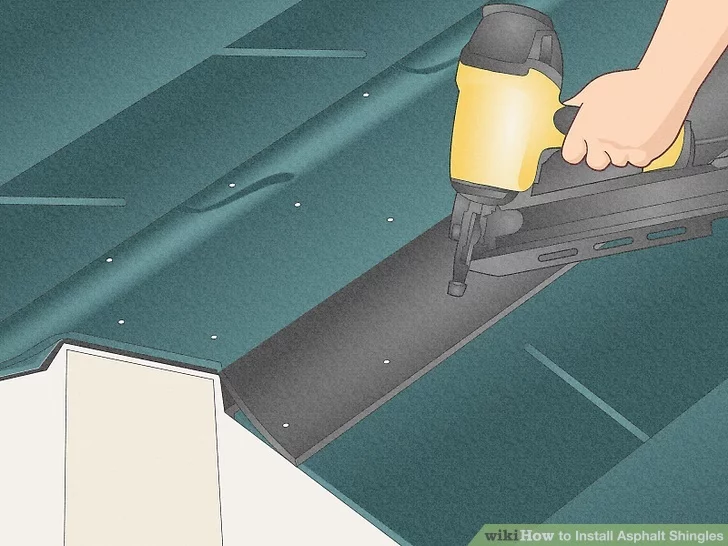
Put Down the Last Course
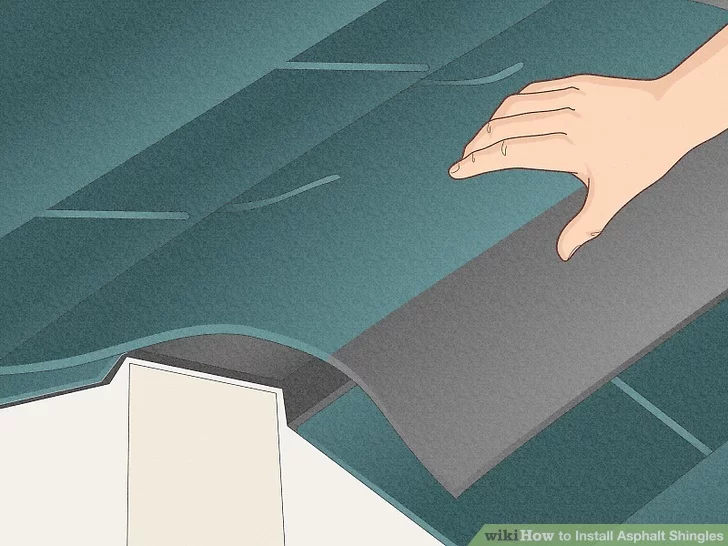
After working your way to the peak on both sides, bend the last course over the ridge to around six inches. Then, nail it down on the other side, extending it over the top of the ridge so that the nails are covered, leaving none exposed.
The exception is if ridge vents are going to be installed, which is a common practice. In that case, the sheeting will stop short on both sides. End your final row of shingles at this point and use the hook blade to cut, then cover the ridge by installing vented cap shingles or continuous ridge venting.
Bend single-tab shingles over the ridge or use special ridge shingles. Then, starting at the end, place a bead of asphalt under the first shingle to hold the tab down. After that, nail each shingle so that the next will go over the nails by around an inch.
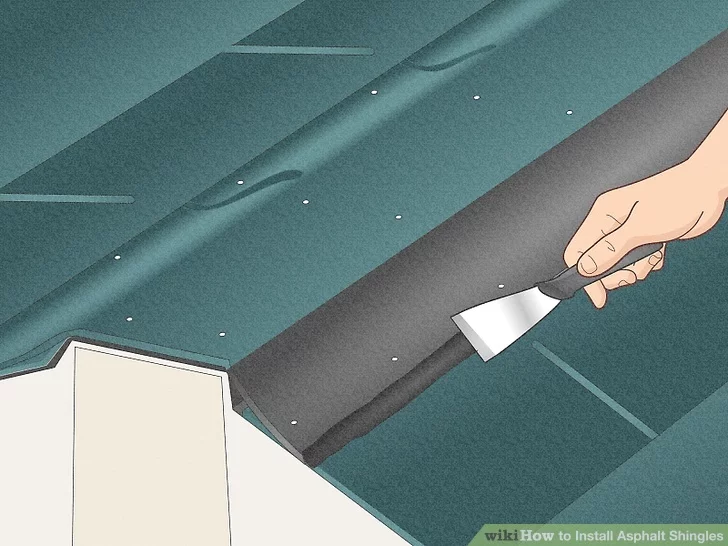
Install the Ridge Shingles and Apply Asphalt Cement
It is time to install the ridge shingles, which you will do by nailing the shingles on both sides of the ridge like before while the asphalt granules are exposed. Once you are at the other end, cut away the asphalt nail line from a ridge shingle.
Finally, apply a generous bead of asphalt cement, dotting it under and around the edge of the last ridge shingle, which is where you should have removed the nail line. Then, nail the four corners to the end of the ridge, adding a bit of tar to cover the nail heads. You should also apply cement over exposed nail heads on the final shingle to prevent leaks.

With over 12 years of construction industry experience, David Bitan specializes in restoring, inspecting, maintaining, and repairing roofs for residential, industrial, and commercial properties.
How to Reroof Your House
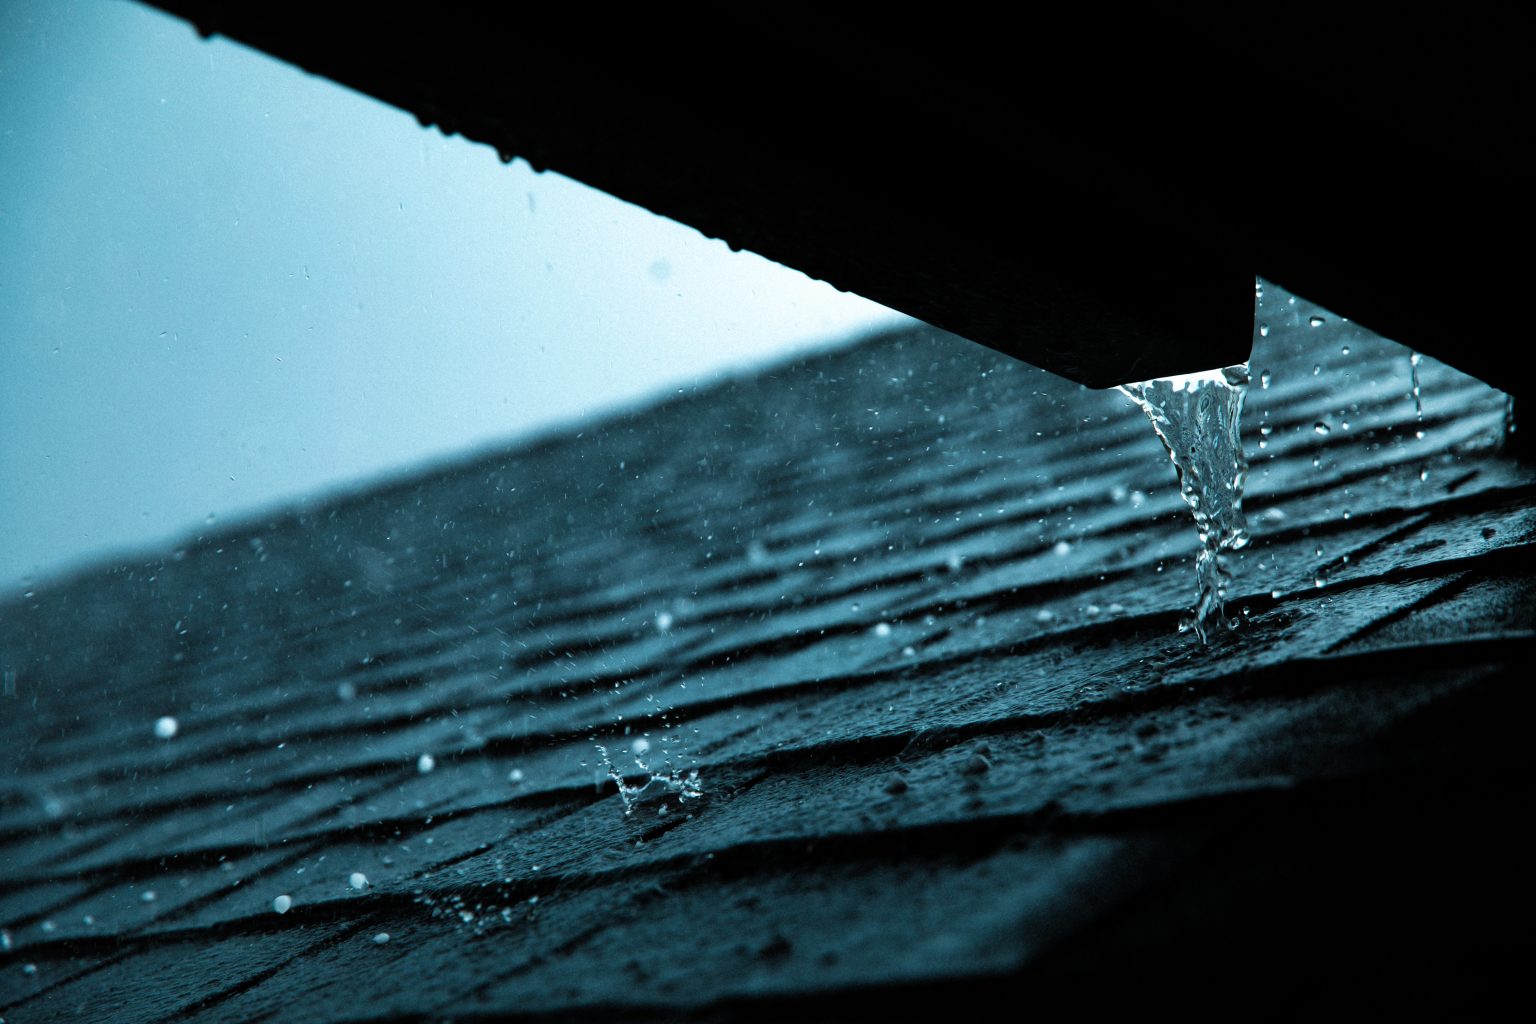
The roof of your house protects you from the elements, and when something goes wrong, it can be devastating. While regular repairs can extend your roof’s lifespan and give you peace of mind, eventually, roofs must be replaced. An asphalt shingle roof will usually last between 15 and 30 years, but it will change with material and other factors.
The good news is that you can reroof your house yourself, assuming you plan things out properly. However, if you decide to do so, take the proper safety precautions, and do not attempt it if you are uncomfortable getting on top of a roof.
The First Steps
Before doing anything on the roof, you will need to do some prep work, starting with understanding the local building codes and getting the required permits. Additionally, you will have to choose the shingles you want to install, calculate how many you need for the job, and measure the length of a shingle according to the roof.
Check the Local Building Codes
Every area has a unique way of doing things, so you want to check the local building codes before doing any work. For instance, in some areas, the layers of shingles you have on a roof will be regulated. There might also be specific materials that are allowed, as well as different requirements based on climate.
In coastal areas, high winds and severe weather can cause a lot of problems. Because of that, there are requirements where structural design and load are concerned. Moreover, permits become even more important in such areas, which is why you should always make sure to procure the proper permits prior to doing any work.
Procure Permits
Checking for permits is a must, no matter where you are or what kind of work you plan on doing. Local government agencies will have all the necessary information, with the Building Services Department in your area being particularly involved. Common things you will need include the following:
- Proof that you own the property
- Any necessary application paperwork
- A statement of repair saying that you will replace the removed roof
- Construction and elevation drawings
The precise things you need to get the job approved will vary depending on where you are and what you plan to do. However, be prepared to show the proper documentation to get what you need.
Choose Your Shingles
While asphalt shingles are the most common choice, there are quite a few varieties, with some more suitable for certain climates and styles than others. When determining which type to use for your roof, consider the area, your house, and the style of the project. Some of the popular shingles include the following:
- Asphalt shingles are common and easy to install. Moreover, their durability allows them to last up to 30 years if properly maintained. They are often secured to the shingles above using roofing cement or tar, and they can be reinforced with fiberglass.
- Wood shingles are not as easy to install as asphalt shingles. Not only are they often hand-split shakes, but they require proper spacing to account for expansion. Fortunately, they last up to 30 years, though that is with proper care.
- Slate shingles are heavy and durable, and they last a long time compared to other types of shingles. However, they require specialized tools, experienced professionals, and considerable upkeep if they happen to break. They are a luxury shingle choice.
Another choice is laminated shingles, which look similar to slate without the same price and installation concerns. Installing them is a lot like installing asphalt shingles, so you can achieve a look similar to slate with an install similar to asphalt.
Calculate How Many Shingles Are Needed
Once you have picked out the shingles for your roof, calculating how many you need to buy comes next. Usually, shingles are sold in bundles, and three bundles can cover one square of space, which is 100 square feet. Therefore, you can use the total square footage of the roof to figure out how many bundles to buy.
To properly measure your roof, break it down into sections and get the width and length of each one. Multiply those values together to get the area, which you will add to the area of every other section.
Once you have the total area of your roof, divide the number by 100, and you will know how many squares there are. Finally, multiply the number of squares by three. Also, it is a good idea to get around 10% or so additional material to account for wastage.
Measure the Length of a Shingle According to the Roof
Practical measurements give you a better idea of how the shingles will lay on the roof, so you should measure the length of a shingle as it lies across the roof. A majority of asphalt shingles are around three feet in length, and most roofs will not be perfectly divisible by that. Therefore, you will likely have a partial shingle at the end of each row.
Additionally, the bottom row needs to hang over the edge. If you are working with a wood shingle roof, that means cutting the shingles that you are placing at the edge to make a straight line.
Preparing the Roof
Preparations are key to a successful project, so go ahead and plan ahead of time. That means getting your safety precautions in order, knowing how you will deal with trash, and stripping the shingles off the roof to make way for the new ones. You will also need to remove any flashing, clean away the leftover debris, and prepare the underlayment.
Take Safety Precautions
Safety is incredibly important when you are doing roofing work, especially if the roof has a high pitch. If that is the case, using a harness and roofing jacks is a good idea. When working with jacks, set 2×10 jacks around three feet above the edge of the roof.
You should also get rubber-soled boots for traction and ensure you have proper work glasses and gloves. You might also want to use scaffolding or toe boards, which will stop equipment and tools from falling from the roof.
Plan for Trash
There is a lot of trash when you are reroofing since you have to remove all of the shingles and debris from the roof. While a basic trash container might be okay for a small roofing job, you probably want to go ahead and invest in something larger, such as a dumpster. Not only will it make cleaning up easier, but it will save you time.
Begin Removing Shingles
Removing shingles is the start of the actual roofing work, and when you start, all of the safety precautions should already be in place. Assuming they are, begin working at the peak of the roof, choosing the side farthest away from the trash container you chose. You do not want to walk over areas you have already stripped later.
There are specific tools to deal with the removal of shingles, which are designed to get underneath them and get them off quickly. However, a garden fork also works, and there is always the option to use a hammer if you do not mind going a bit slower. No matter what, make sure to pry up any nails and loosen the ridge caps first. Here are some helpful things to keep in mind as you work:
- You can toss any debris and shingles from the top to the roof jacks if you have them, taking breaks to move debris from the jacks to the trash from time to time.
- Removing the shingles from your roof can be physically demanding, so plan enough time to properly get it done.
- Always consider your footing, and consider working with someone else to ensure nothing bad happens while you are alone.
While you are removing shingles, keep an eye out for nails and other debris. You will also want to check the roofing underneath, noting any potential damage that needs to be dealt with before new shingles go down.
Remove Flashing
After the shingles are out of the way, you can take care of the flashing around things like chimneys, vents, and valleys. Some of it might be salvageable and reusable, so be careful when taking it off. But flashing in valleys is almost always replaced.
Replacing the flashing in the middle of the project is a good idea. Moreover, if there is ever any doubt about the condition of a piece of flashing, go ahead and replace it to be on the safe side.
Clean the Roof
There will always be some debris left behind when you are done, whether it be dirt and dust or some nails that got left behind. Sweep the roof while keeping an eye out for nails, removing anything you see. It is also a good time to secure loose boards to the sheathing, checking once more for damage and replacing anything that looks problematic.
Install the Underlayer
An ice and water barrier and asphalt felt provide superior weather protection that will keep your home protected. When installing the ice and water barrier, make sure to cover any gutter flashing if you have gutters. Otherwise, follow these steps to install the underlayment:
- Hold it in place at the top using staples every couple of feet
- Lift the bottom and peel away the backing before letting it fall into place
- Ensure it properly stuck to the roof
Next, unroll and staple 30lb felt across the rest of the roof, using 5/16-inch staples to prevent it from blowing away or moving when stepped on.
Asphalt roofing paper is a good final touch for “weathering-in” your roof. You can utilize 2-inch tin caps under your roofing nails to prevent tearing, but that is only necessary if you expect wind before the new shingles are applied.
When installing the roofing paper, keep it straight using chalk lines, which you can easily snap on. It is important because using the bottom of the roof as your guide will likely result in crooked paper, which means wrinkles. Additionally, allow the felt to go past the bottom edge of the roof around 1/4 to 3/8 of an inch.
Putting on the Roof
After you have removed the old roofing material and ensured there is no damage, you can start putting on the new roof. That means installing drip molding, adding the flashing, and then getting to the shingles themselves. Just make sure to add chalk lines to make things easier and plan things out ahead of time for a smooth project.
Install Drip Molding
The first step is to install drip molding around the edge of the roof, which can be done by using roofing nails spaced 12 inches apart. It should surround the entire roof and extend 1/4 to 3/8 of an inch past the edge, covering the felt paper installed in the previous section.
Add Flashing
With the drip molding out of the way, begin working on the flashing, particularly the valley areas, which is where two sections join. Use the same method you did to nail down the drip molding.
Usually, valley flashing will come premade, either being bent to fit the area or flat and ready to be cut and placed. There is also the option to use old flashing, though valley flashing is rarely reused, so you will likely just want to replace it.
Place Chalk Lines
Chalk lines keep things in order on the roof. Not only do lines ensure you keep the rows straight, but it provides you an idea of how the layering will go. The space between lines should be six inches, starting from the bottom of the roof and working your way up to the peak.
Lay the Starter Course
It is time to start laying shingles, which means placing down a starter course. You can follow the chalk line, placing them at intervals of six inches. You will want to nail them in place using three nails for each shingle. The nails should be spaced three inches apart from top edge to top edge.
While it depends on what type of shingles you are using, there might be a special starter row or a strip of material that can be cut to fit the length of the roof. If there is, simply follow any instructions provided.
If you happen to be using three-tab shingles, the nails should go around 3/4 of an inch above the cutouts, close to where the tabs meet the upper section of the shingle. You will also want to place a nail two inches from each end, lining up with the other two. That means using a total of four nails per three-tab shingle.
Lay the First Course
The first course will be unique since it will need to have six inches cut off the length to properly join the ends of the first regular row placed over the starter shingles. However, before doing that, you can snap another chalk line above the starter course to act as a guideline.
You can also accomplish the desired results without any cutting. All you have to do is turn the shingles upside down, which will have the tabs facing up. After this row, the rest will be placed full-size.
Lay the Remaining Courses
When you get to the second row, you need to set the first shingle back off the edge of the roof by half a tab, which is six inches. The goal is to stagger the cutout slots, preventing them from lining up. When placed, the bottom of the tabs should just touch the tops of the cutout slots on the shingle below.
Repeat the process for each row, trimming shingles to fit the space left at the end of each row. Additionally, you will want to leave some space around vents, chimneys, and flashing since they will require extra care.
Install Shingles Around Chimneys and Vents
Vents, chimneys, and other protrusions can require some extra time since you need to install flashing. Here are some basic steps you can follow when dealing with a pipe:
- Cut flashing that extends six inches in every direction and has a hole in the center large enough for the pipe to fit through.
- Place the flashing and install shingles over it, using adhesive to hold it in place.
- Cut a special shingle to fit over the pipe.
- Consider using a vent pipe boot, which slides over vent pipes to add protection.
- Also, consider a rubber gasket to keep joints from leaking.
Chimneys are handled a bit differently. Cut strips of flashing that can be bent to create a joint between the wall of the chimney’s outside and edge and the roof. You can then bring shingles to the edge of the flashing, installing over it as normal using adhesive. Make sure you get flashing done properly to avoid leaks down the line.
Install the Ridge Shingles
Installing ridge shingles is the final step, and it can be done in a few ways. First, you can use preformed ridge shingles, which can be installed according to the instructions. Another option is creating ridge shingles by cutting and bending regular three-tab shingles. They can be folded over the ridge and installed normally after being cut to size.
Regardless of how you go about it, make sure to cover the top of any exposed nails with adhesive to prevent future problems.
Finishing Things Up
Once the shingles are installed, it is time to clean everything up since there are bound to be nails and debris scattered about. These things can be dangerous, so you need to check the roof and around the job site, such as in the yard. Clean up anything you find.
A great tool for finding loose nails is a roller magnet. You simply push it around to find nails, which is especially useful in areas where seeing nails by eye could be difficult. Consider renting or borrowing one to make cleanup easier.
Maintaining Your Roof
Proper maintenance is necessary to achieve the maximum life of your roof. It is especially important when you do your own roof work since it might not last as long as a professional job. That is why regular inspections and repairs are recommended, with the goal being to find and fix problems before they become serious.
Annual Inspections
The timeframe for inspections can differ based on the material and roof type, but it is recommended that you perform annual inspections. It is especially important if you live in an area that experiences severe weather conditions, such as heavy rain and winds. Perform an inspection on a clear day to look for damage, and take a look after rainy days to search for leaks.
Check for Cracks and Rust With Flashing
Cracked caulk and rust are common problems with flashing, which is particularly vulnerable to the elements. These problems can result in leaks, but they can also be easily fixed. Take a quick glance at any exposed flashing for signs of wear, and reseal any areas with cracked caulk.
Search for Curled Shingles
If you notice curled shingles, it is likely due to wear and tear or high winds, but it should not be a problem in the early years if the shingles were installed properly. However, if shingles were left loose during installation, it might happen.
If you see curled shingles, you will want to reattach them, which can be done by hammering in loose nails or adding new roofing nails as needed. Adding a dab of adhesive under the edges is also a great way to prevent curling.
Get Rid of Any Moss
Moss will damage your roof due to the moisture it holds, ultimately decreasing its longevity. Dead moss can be brushed away with a broom, but you can also use a solution to kill moss. You can also try using baking soda, which is a natural alternative. It is also useful to keep moss away.
Look Inside the Gutters
Gutters will inform you if your shingles are nearing the end of their lifespan. You will know because there will be granules that come off the shingles when it rains. If you see the granules, it means the shingles are no longer faring well against UV rays, so it is time to consider replacing them.
Keep an Eye Out for Leaks
Leaks are another problem you want to keep an eye out for, especially when it comes to internal signs. If there is a leak, you want to find the source and fix it as quickly as possible. If it is not fixed, there is a chance of more serious problems, such as structural damage. Keep an eye out for the following:
- Peeling paint
- Damp or dark areas
- Water stains
When it comes to water damage, consider calling a professional roofing contractor since they can tell whether there is any structural damage that needs to be addressed. If you decide to find the source of the leak yourself, keep in mind that the problem might be higher on the roof than it appears in the house.
With over 12 years of construction industry experience, David Bitan specializes in restoring, inspecting, maintaining, and repairing roofs for residential, industrial, and commercial properties.
Claim Your Free Roof Inspection Today.
Roof issues are a buzzkill, but not with Bumble Roofing on your side.
Fill out the form, and our expert team will assess the condition of your roof to advise on the best course of action to maintain the health and longevity of your roof.