How to Build a Roof
Having a good roof over your head comes with a lot of benefits, such as protecting you from the elements. It will also stop moisture from getting inside and wreaking havoc. Additionally, it ensures water is drained and provides insulation that ensures comfort, regardless of time of the year.
On top of the practical, a roof is a decorative addition that can change the look of a home, depending on the style. But there is more to picking out the best type of roof than appearance alone. Other things you will want to consider include the structure and the climate and precipitation in your area.
The following article will provide you with the basics of how to build a roof. The topics covered here include choosing a style and materials, preparing for the build, and a walkthrough on building a basic gable roof.
Choosing a Style and Materials

License: Creative Commons
When it comes to choosing a roof type for your home, you have hundreds of options, with each type having its own purpose and allowing for different materials. However, you will also need to consider things like climate and location if you want to build the perfect roof for your home. Starting with the style will make things easier.
Choose the Style
Flat and pitched are the two major categories you need to know, but the shape of the building will ultimately determine the style of roof you choose. Consider a square building. If you want to build a round roof on a square building, it will not be easy.
While it is a simple example, the shape of the building is equally important for more complex buildings and roof styles. Therefore, allowing the building shape to guide you to the best roof is often the best choice. Below are some common roof styles:
- Gable: The gable roof is the most popular roof style in North America, and it is also the easiest to build. It looks like an inverted V, though there are variations suited for more complex buildings. That includes the saltbox roof to join walls of different heights.
- Flat: The flat roof is mostly flat, but it does have somewhat of a slope, albeit slight. The slight slope allows for drainage, preventing damage to the roof while still allowing outdoor roof gardens or living space.
- Pyramid: The pyramid roof is meant for use on square buildings. It is also a popular roof type in North America. Moreover, it is easy to install. Though, it does require more material than a gable roof.
- Hip: The hip roof is elongated and meant for use on rectangular buildings. Much the same as the pyramid roof, it is a popular roof type that is easy to build but requires more materials.
- Gambrel: The gambrel roof is often referred to as a barn roof, and the purpose is to maximize the space in a roof or attic.
- Shed: The shed roof is perfect for sheds, porches, and home additions because it has a greater slope.
What type of roof style and material you choose comes down to what you want and what best fits the needs of your home. However, there is more to think about than the shape of the building. Taking a look at the climate in the area before making a decision is a must.
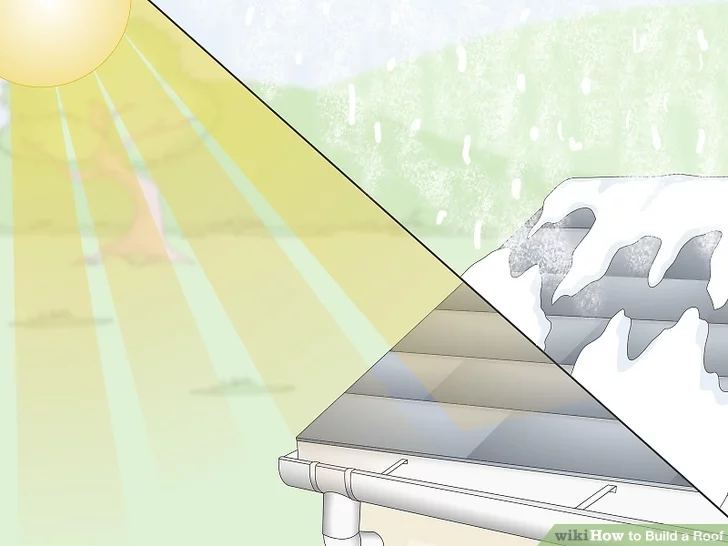
Consider the Climate
License: Creative Commons
Environmental factors are major considerations for any building project. For roofs, it is all about suitability. Some roofs are more suitable in some climates than others, such as the fact that gable roofs are not great in areas with high winds. On the other hand, a hip roof is great in an area with high wind conditions.
The temperature is another concern to keep in mind. Flat roofs are not the best choice when there is high precipitation, but they perform well in hot, dry climates. Pitched roofs are better for high precipitation environments, with the optimal pitch varying based on the amount of rain or snow expected.
Simple pitch roofs are also great when it comes to temperate climates that experience all of the seasons. You do not have to worry about leaves or needles getting stuck, and snow and rain will run right off.
License: Creative Commons
Pick the Materials
License: Creative Commons
The many types of roofs out there can be built in different ways with various materials. But some materials are more suitable when used with particular styles. Likewise, there are styles with versatility in the materials used. Some examples include:
- Pitched roofs can have metal or wood frameworks. They can also use a variety of outer materials, such as wood or asphalt shingles. Other choices include clay or concrete tiles and metal sheeting. However, it is important to match the outer material with a framework (truss) that can support its weight.
- Flat roofs can utilize various materials for their exteriors, including asphalt, metal, fiberglass, or polyvinyl. But despite the versatility, shingles will not work.
Material choice might also be influenced by the climate. Algae-resistant asphalt shingles are great for humid areas, while you can choose clay tiles for humid environments. Moreover, durability is important if there is heavy snowfall to prevent collapses. Overall, metal and asphalt shingles are seen more than other exterior materials.
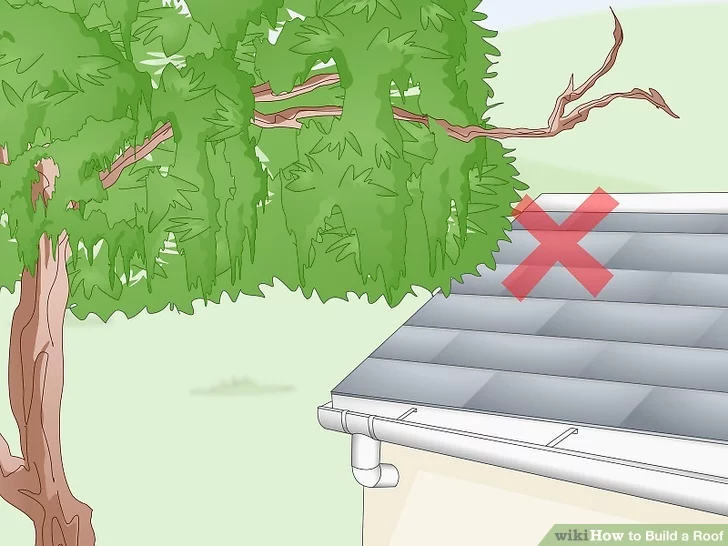
Location, Location, Location
While the location might be inevitable, it is still something worth considering as you go to build a roof. For instance, building the roof under a tree. Heavy branches can cause serious damage, especially if they fall on less durable material.
Drainage is also worth considering. You do not want the water running off directly into the yard. That means your roof needs to be designed and equipped with a way to properly drain precipitation.
Additionally, if you live close to another home, you might need to consider certain things. One example is needing to build a roof with a smaller eave.
Preparing to Build Your Roof
License: Creative Commons
Preparation is key for a successful, stress-free build. That includes determining the pitch, measuring the roof, planning things out, and securing your materials. And to get things started, you will need to determine the pitch and get your measurements.
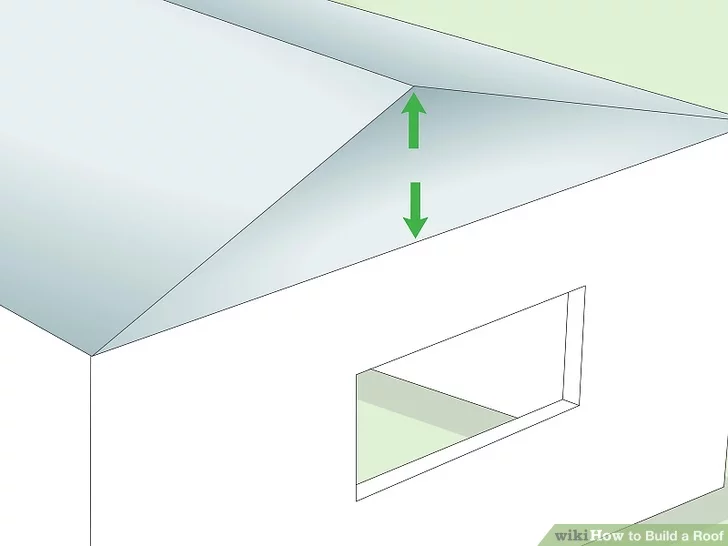
Determine the Pitch and Measure
License: Creative Commons
The pitch refers to the rise over the run of a roof. That can be put in terms of the vertical angle and horizontal measurement. It can range anywhere from 2:12 to 12:12 and denotes how many inches a roof rises over 12 inches of horizontal distance. So, at 2:12, the roof rises by two inches for every 12 inches it goes horizontally. People can still walk on a roof up to 5:12, or five inches for every 12 inches it goes horizontally.
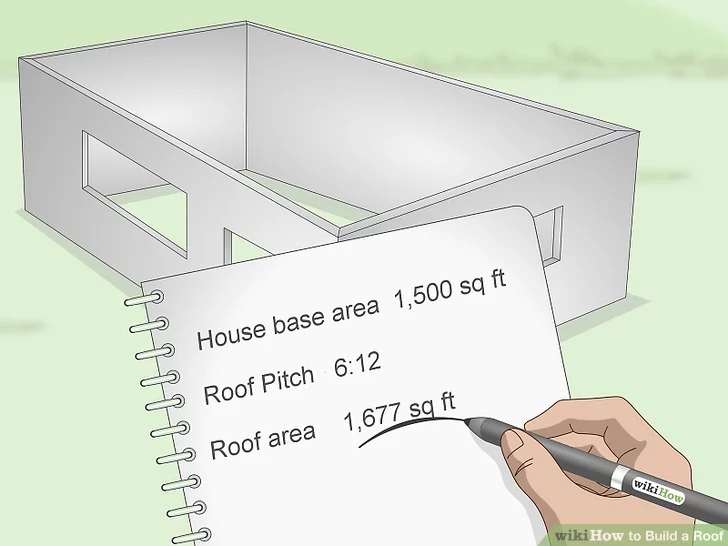
After determining the pitch, you will need to measure the roof to ascertain material quantities. You want to pursue accuracy to avoid overspending, so try using a roofing calculator. It will help you determine the necessary roof area using the base area and pitch of the roof you want to build.
License: Creative Commons
Plan and Purchase
License: Creative Commons
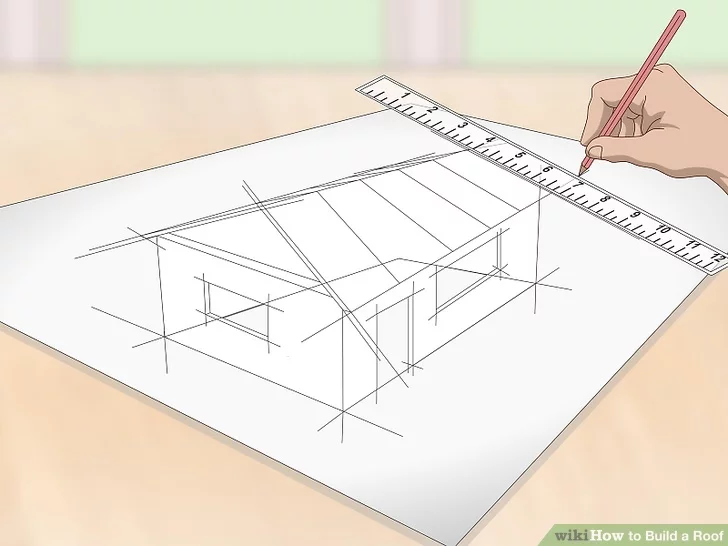
Creating a plan is a mandatory step that ensures you have a clear direction for the build to come. You want to have a diagram that includes style and shape, as well as the measurements, materials, and truss spacing. Details matter when planning, so include as many as possible before purchasing materials.
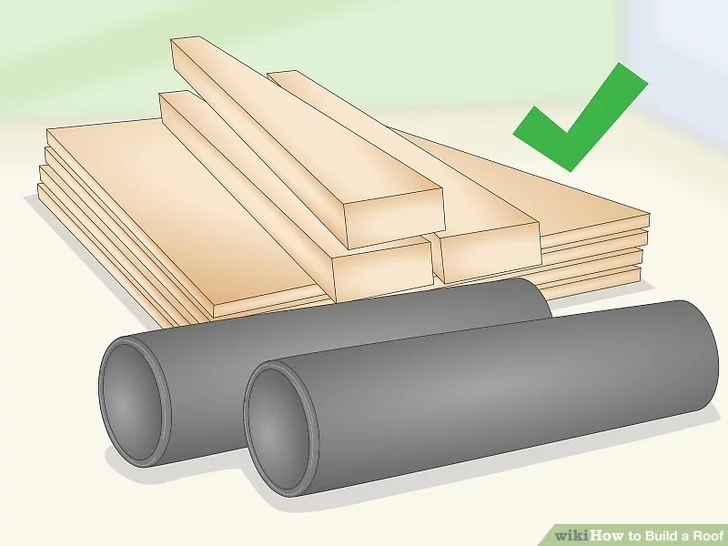
With the pitch and measurements in hand, you can buy your materials. You will likely be using fabricated trusses since they are the fastest and easiest way to create a frame. In fact, most roofs are built with fabricated trusses these days. Additionally, the rafters and ceiling joist are built into each truss.
Aside from fabricated trusses, some of the other things you might want when building a basic gable roof include the following:
- Sheathing material
- Underlayment
- Roof covering
- Roofing nails
The materials and tools will depend on the roof, the shape of the building, the climate, and more. For sheathing material, expect something like plywood or fiberglass. The underlayment will include tar paper and maybe an additional barrier for cold environments. As far as coverings go, the materials are numerous and include shingles, tiles, and metal.
Building a Basic Gable Roof
License: Creative Commons
Even a basic roof can be a complicated project that requires precision and a methodical approach. But as long as you do it well, you will have a new roof that will last anywhere between 20 and 50 years.
Before jumping into things, it is important to understand the process, which has four main steps:
- Framing: Construct and install the roof frame, which you can do using premade trusses.
- Sheathing: Lay down a layer of material atop the frame to provide the surface of the roof.
- Underlayment Installation: Install a protective layer covering the sheathing. It can also involve an additional step of putting down an ice barrier layer atop the underlayment.
- Roof Cover Installation: Install a layer on top of the underlayment to protect the roof from the elements.
Throughout every step of the build, make sure that you wear proper fall equipment. Additionally, you should adhere to local building codes and secure the proper permits before building begins.
License: Creative Commons
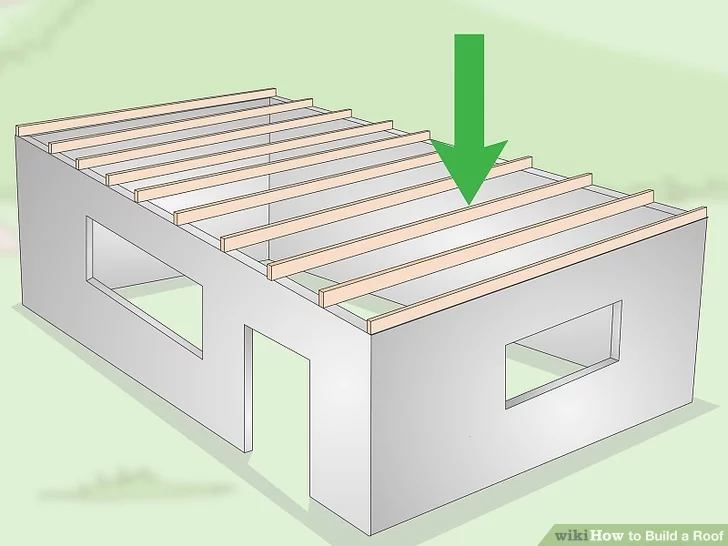
Mount the Trusses
The first thing you want to do is mount the trusses. However, before you do so, the wall frames need to be level, plumb, and square. You must then hoist the trusses onto the roof with a crane or multiple people. Additionally, if the building is still a frame, you can use a ladder or scaffolding for this part.
Keep in mind that the spacing between trusses will depend on the building codes and how much weight they need to support, which is impacted by snow and other factors. Generally, they will be 12, 16, or 24 inches apart.
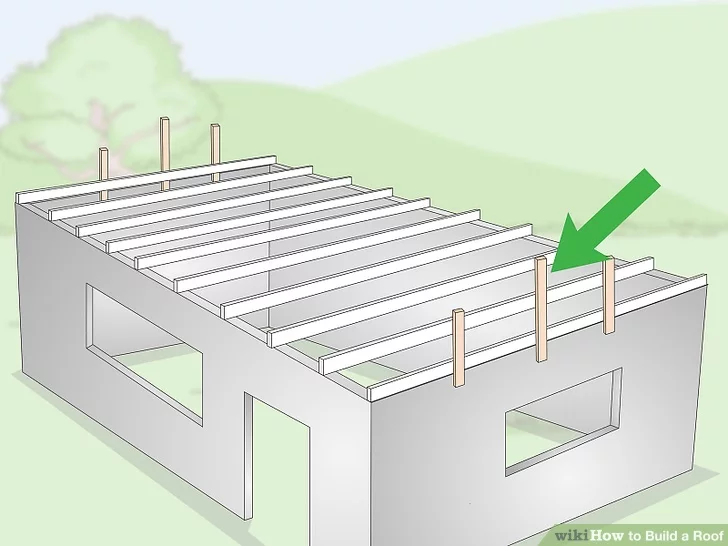
Install Temporary Braces
License: Creative Commons
You cannot immediately install the trusses once they are mounted. Instead, you must fix temporary braces to keep them in place while you get sheathing and permanent bracing installed. To start:
- Go to the back wall and find the center.
- Grab a 16-foot two-by-six board.
- Nail the bottom half of the board to the top of the outside wall.
The top half of the board should go past the top of the roof, allowing you to fasten it to the initial truss. When installing the temporary braces, make sure you fasten them to a stud.
With the first brace in place, take another board of the same type and length and nail it six feet to the left of the center brace you just installed. There should also be one placed six feet to the right. Once you have those secured, it is time to do it again, repeating the steps for installing the temporary braces, this time at the front.
License: Creative Commons
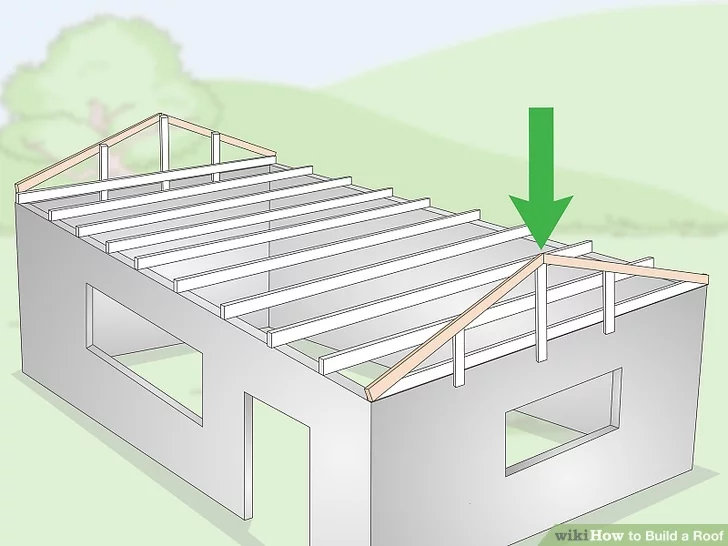
Install the End Trusses
At this point, the temporary braces should be in place. With that done, you can start installing the end trusses. Like the temporary braces, it will be done at the front and back of the building. Get started by following the manufacturer’s instructions and affixing them to the temporary braces.
After the end trusses are installed, get a batten. It should be a bit longer than the distance between the trusses. At the back of the building, nail it to the end truss. When done properly, it will stick out perpendicular to the front of the building. It can then act as temporary bracing for the next truss. Now you can move on to the standard trusses.
Install the Standard Trusses
License: Creative Commons
You will once again be working from the back to the front of the building. During this step, continue following the manufacturer’s instructions, getting the first standard truss in place. Then, nail it to the batten from the first truss. After that is done, grab another batten and nail it to the end truss and first standard truss. The length of the new batten should be able to attach to four separated trusses.
Once the new batten is in place, continue to install standard trusses, spacing them based on your plan. If you run out of space on the batten, install longer batten ties until the batten reaches from one end truss to the other. Each batten should roughly be long enough to handle around four truss lengths.
Keep in mind that some building codes require you to attach your roofing system to the structure below using steel connector plates or hurricane clips. Do your research and always make sure you are going by the book.
Once all of them are installed, it is time for permanent bracing. Detailed information can be found in the truss manufacturer’s instructions.
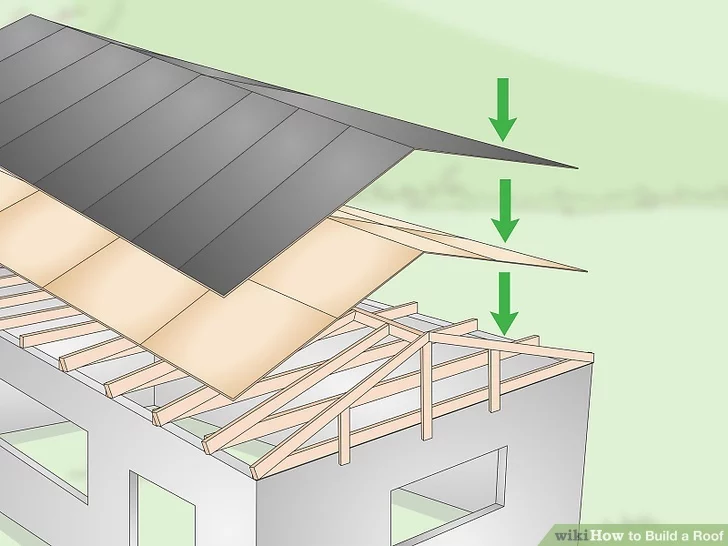
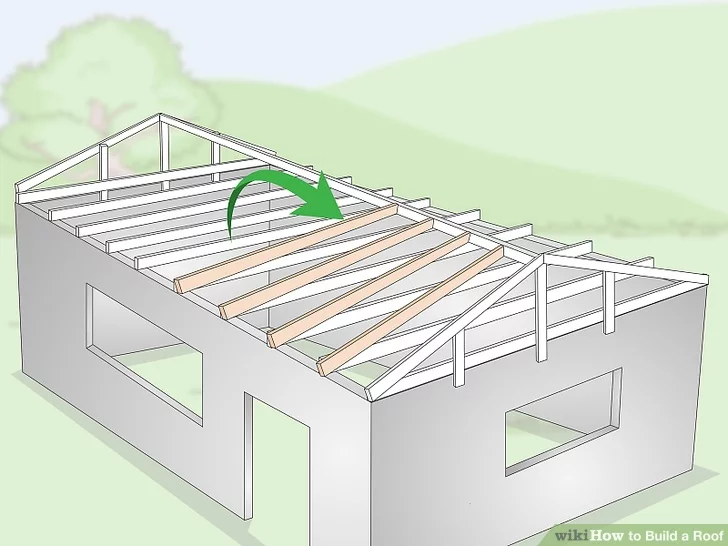
Begin the Sheathing Process and Install the Drip Edge
License: Creative Commons
Now that you have properly anchored trusses and permanent bracing, you can start the sheathing process. You will install the sheathing lengthwise, going from the bottom corner and installing it at the bottom first. After moving up a row, start at the same side and stagger it by a half sheet of sheathing.
License: Creative Commons
When placing sheathing, you must join panels over supports, keeping them 1/8 of an inch apart. During the process, keep these things in mind:
- Use 8D common or deformed shank nails to fasten sheathing to the frame
- Keep fasteners 3/8 of an inch from the edges
- Space fasteners six inches apart around the edges of each panel
- Space fasteners 12 inches apart within each panel
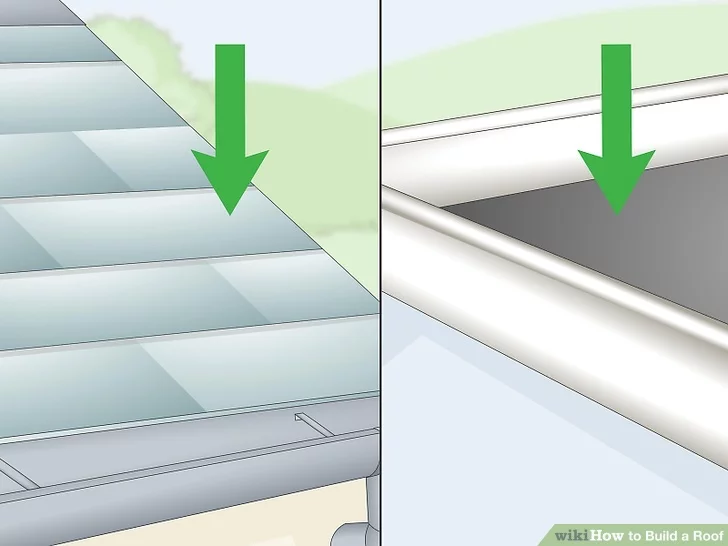
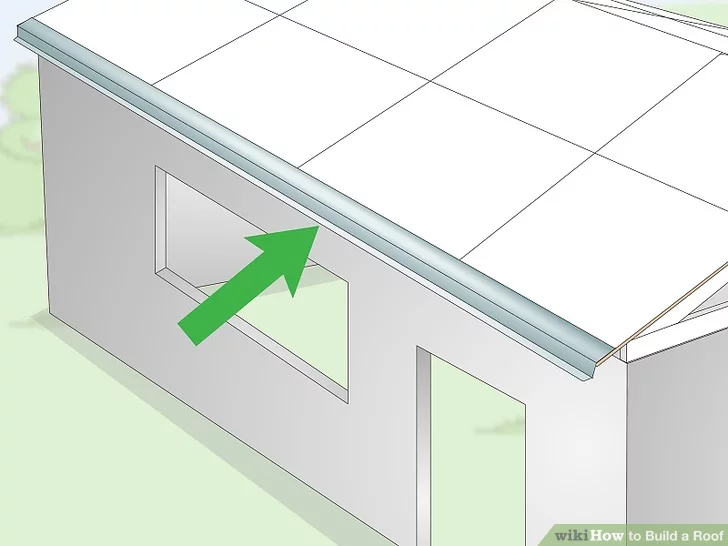
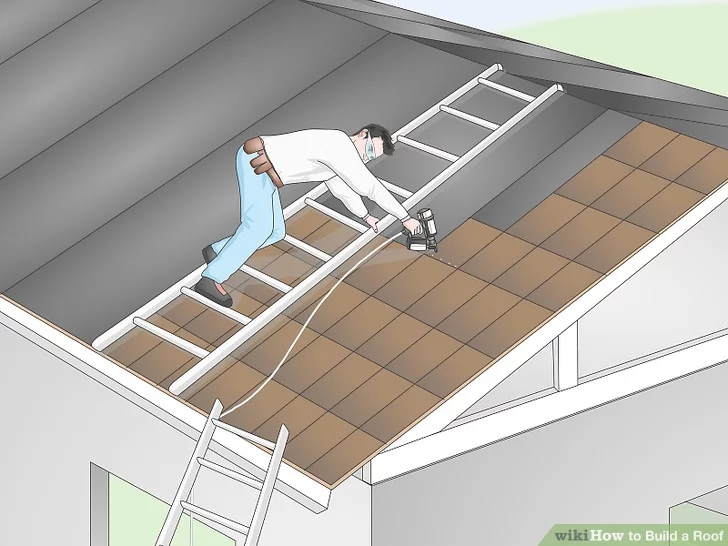
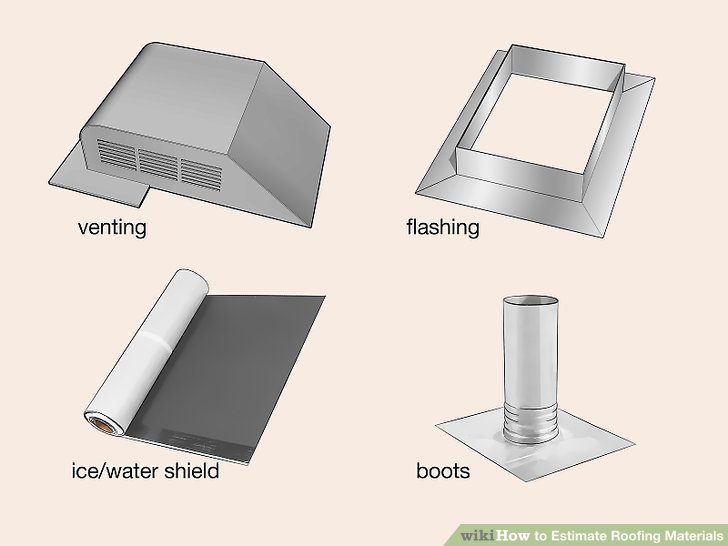
Repeat the above for each side of the roof, then install the drip edge. It is a simple metal flashing meant to protect sheathing from the elements. Particularly, it is used to protect against rain. It will direct it into a gutter if one is present or send it away from the house.
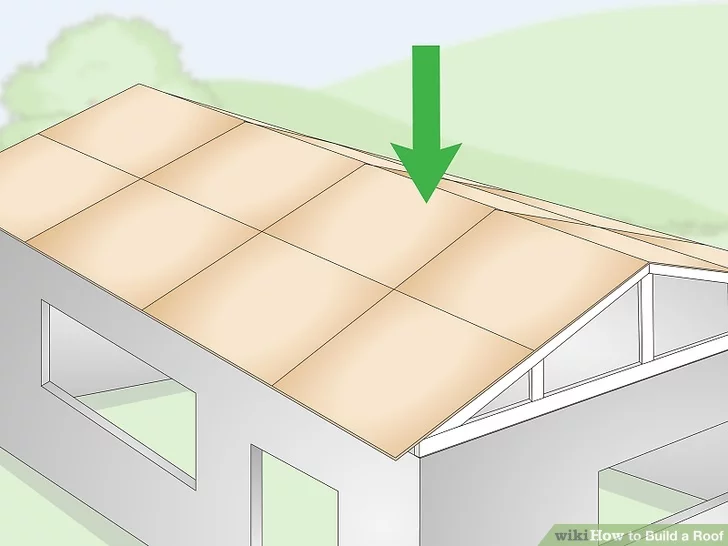
Install the Underlayment and Roof Cover
License: Creative Commons
Underlayment is incredibly important when building a roof since it serves as a waterproofing measure. Usually, roofing felt will be used. It uses asphalt instead of the tar found in tar paper. To properly install the underlayment, follow these steps:
- Start at the same place you did with the sheathing. Then, roll it out flat. You want to go lengthwise over the sheathing, stapling everything securely as you go.
- Roll out the second layer toward the ridge of the roof, overlapping it with the first by around six inches. Continue the process until you cover both sides of the roof.
- Roll the last layer over the ridge. You want to ensure that it overlaps the underlayment on both sides by eight inches or more.
License: Creative Commons
Once the underlayment is down, you can start installing the roof cover. It should be installed from the bottom up, lengthwise, just like the underlayment and sheathing. If you are using shingles, stagger them like sheathing, making sure they overlap. Additionally, make sure you finish things off with ridge cap shingles.

With over 12 years of construction industry experience, David Bitan specializes in restoring, inspecting, maintaining, and repairing roofs for residential, industrial, and commercial properties.
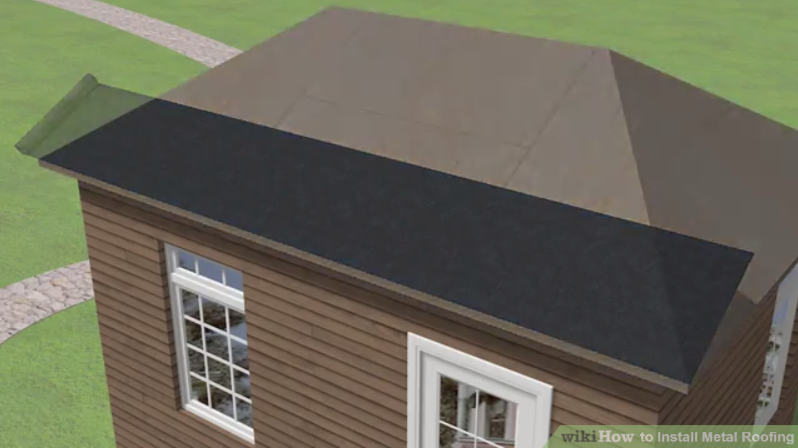
How to Install Metal Roofing
Metal roofing is a popular choice these days, and there are plenty of reasons for it. For starters, it lasts anywhere between 40 and 70 years, which will change based on the material. It is also a durable choice that helps homeowners save energy. Moreover, metal roofing comes in many colors, textures, and styles that make it perfect for almost any home or style preference. Therefore, learning how to install metal roofing will allow you to improve your home’s efficiency and aesthetics while saving money.
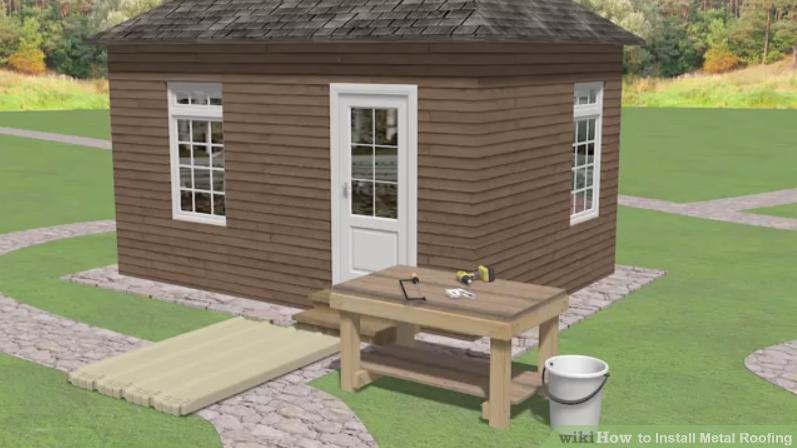
Get the Roof Ready
License: Creative Commons
The first step to installing metal roofing is getting the roof ready. It involves measurements and calculations you will use when ordering materials. It also includes getting the materials and setting up the work site, allowing you to remove the old roofing, repair any damage before the installation, and add insulation without worry.
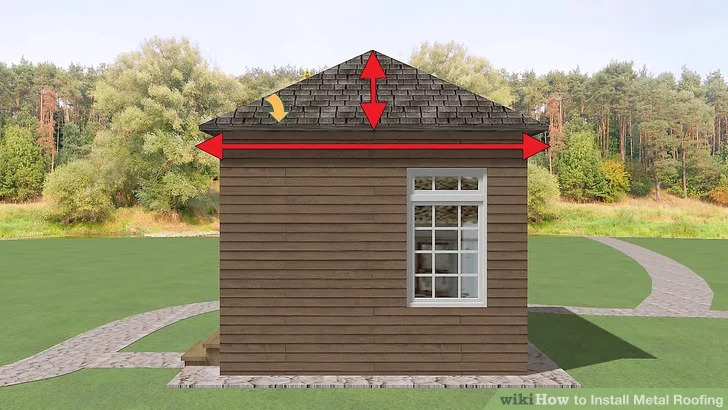
Take Measurements of One Section
It is easiest to proceed by measuring one section at a time. As such, make sure to pick a section and get the length and width. You will also want to measure the rise of the section. Keep in mind that accurate measurements are vital for ordering materials, so doing this part correctly will save you time and money.
First, measure the length and width. After that, get the distance the roof rises. You will want to go from the lowest point to the highest point. Preferably, you can do the measurements from the ground. But if that is not an option, make sure to take proper precautions, even if you have experience with similar work.
Once you are sure you have the measurements, it is time to move on and calculate the slope factor.
Calculate the Slope Factor
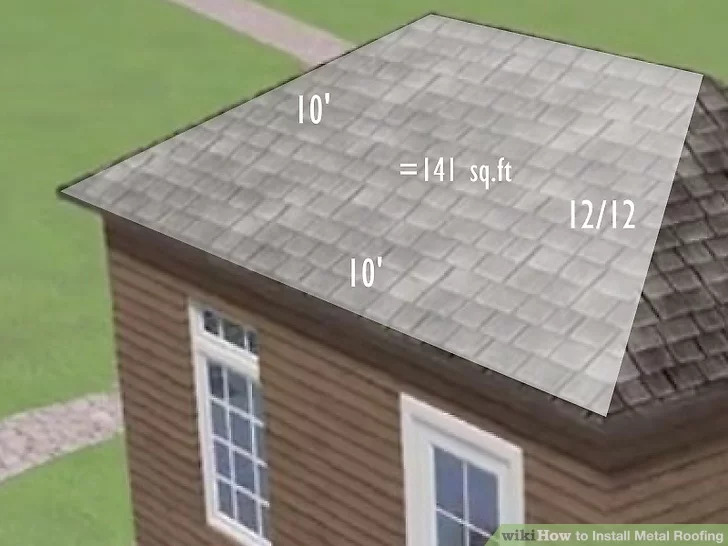
License: Creative Commons
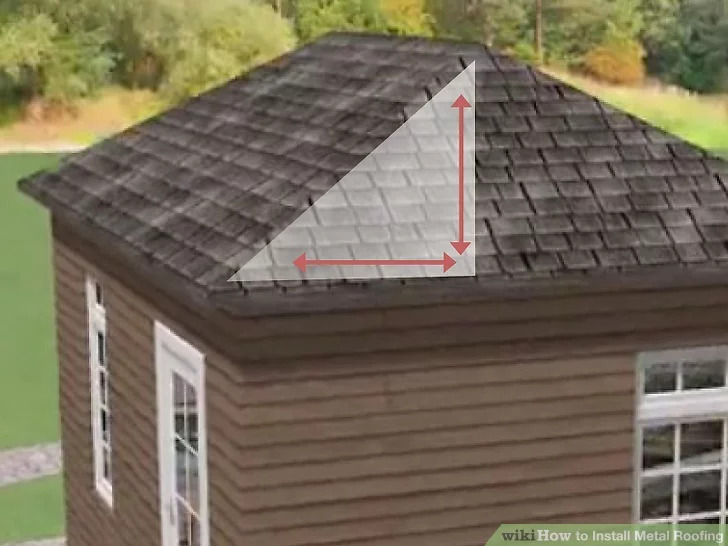
Calculating slope is as easy as rise over run, with the rise being the distance up the roof and the run being the distance across the roof. Typically, it will be a measurement across 12 inches (30.5 cm). For instance, 4/12 or 8/12. Once you have rise and run, the next step is to convert it to the slope factor using the formula √(rise2 + run2) / run.
Here are step-by-step instructions that will make it easy to follow the formula and get the correct calculations:
- Square the rise
- Square the run
- Add the squared values
- Get the square root of the sum
- Divide the new value by the run
Once you have the slope factor, it can be used to determine the area of the section from which you took the measurements.
Determining the Area with Slope Factor

Area equals the length times the width, but in this instance, we also want to multiply by the slope factor. The end result is a formula where area equals length x width x slope factor. By plugging in the correct values, you can get the square feet that need to be covered for that section.
Imagine you have a roof with measurements of 10 feet (3.0 m) by 15 feet (4.5 m) with a slope of 12/12. The slope factor would be calculated with √(12 x 12 + 12 x 12) / 12, and it would come out as 1.414. You then find the area of roofing needed for that section by multiplying the values together, so 10 x 15 x 1.414, which gives you 212 square feet.
Once you feel comfortable with the measurements and math, you can determine the total square footage and start getting your materials.
Find Square Footage and Buy Materials
License: Creative Commons
The square footage is easy to find once you have the previous steps mastered. To find square footage, do the above steps for every section of your roof. Once you have all the measurements, simply add them together. That will give you the exact amount of metal roofing you need to order, though you should probably purchase somewhere around 10% extra to account for waste.
With the square footage in hand, getting materials becomes the main focus. The metal roofing will probably need to be ordered so you can get the material and color you want to suit your house. Additional tools and materials you will need include:
- Large garbage can or dumpster
- Jigsaw or power metal shear
- Staple gun
- Drill and assorted bits
- Roofing nails (1¼ inch)
- Metal roofing screws
- Self-drilling, self-sealing wood screws
There might be other tools and materials you need, but these cover the basics. Once you have your materials and tools in order, you will want to prep the work site.
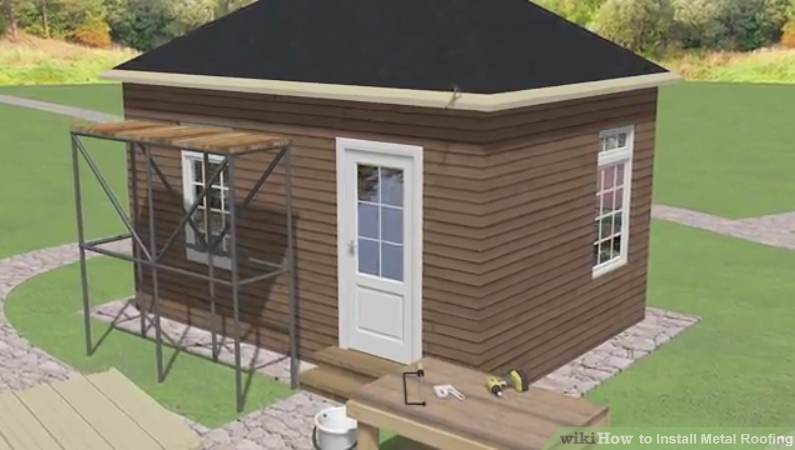
Prepare the Work Site
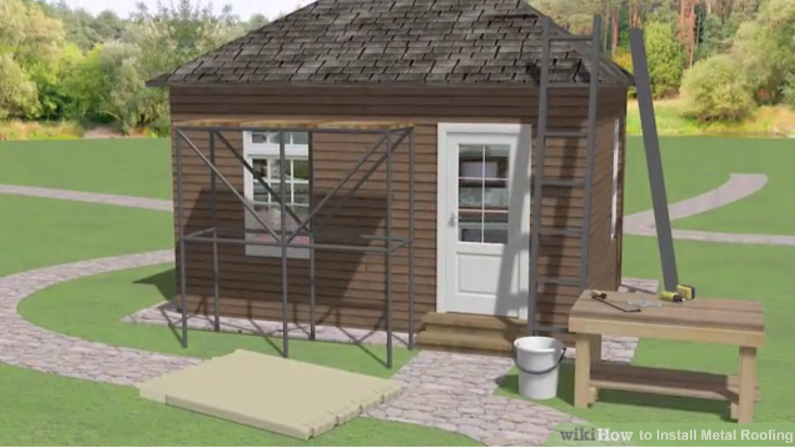
License: Creative Commons
Every work site is different since there is a lot of home variety out there. People tend to prefer different setups as well. However, you want to make things as neat and organized as possible to save time and prevent injuries. Here are some tips to keep in mind when preparing your work site:
- Have a garbage can or dumpster around for the old roofing and debris
- Dedicate a place for tools to keep them safe and organized
- Set up sturdy scaffolding or a ladder
- Make sure electric tools can be used without any tangled or intrusive cords
- Store materials in an accessible area safe from weather
Proper planning is worth the effort, and it will make the rest of the steps much easier and safer. Next up is removing the old roofing.
Remove the Old Roofing
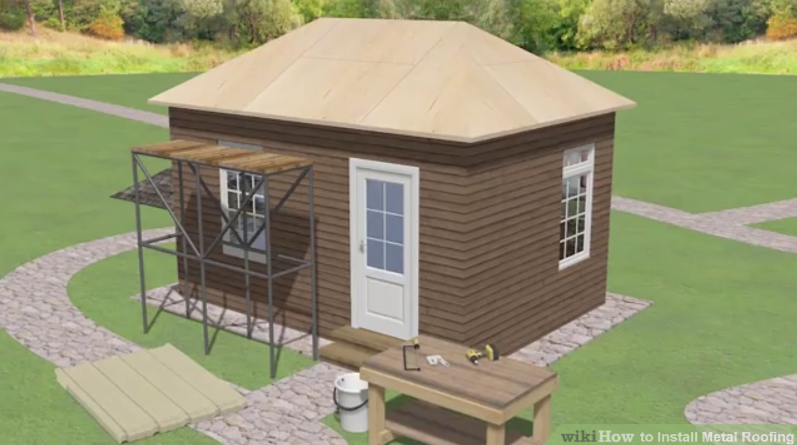
License: Creative Commons
Corrugated metal roofing can be installed over shingles, but it does not provide as good a foundation. Usually, you will want to remove the old roofing before you install metal roofing. Take your time and make sure you get the job done without damaging the bare bones of the roof. Here are some tips to make the job easier:
- Start at the highest point as far away from the trash container as you can
- If you see large nails sticking out, remove them or hammer them flush
- If needed, reposition your gutters at this stage
- Only remove old roofing on dry and sunny days to avoid moisture
With the old roofing removed, the last steps are repairing any damage and putting down insulation.
Repair and Insulate
License: Creative Commons
The old roofing might have been covering up damage to the sheathing, insulation, or ventilation. If you see anything wrong, take the time to fix it before going any further since it should all be exposed and easy to access.
Once any damage is repaired, you can move on to adding an insulation layer. It will help block moisture between the sheathing (the wood under the roofing) and the metal roofing. Start with roofing felt across the entire roof. You can secure it using a staple gun or nails. After that is done, cover it with a breathable membrane.
Install the Metal Roofing
At this point, the project should be thoroughly prepared, so it is time to begin installing the metal roofing. Before getting into it, make sure you have a pair of thick gloves. Metal roofing can be very sharp at the edges, so wear gloves when handling it. With that in mind, you can move on to installing the edging.
Install the Edging
License: Creative Commons
The first step when you go to install metal roofing is installing the edging, or eave flashing. Edging consists of metal strips that cover the perimeter of the roof, and it can be secured to the subroof using the 1¼-inch nails mentioned in the materials step above. Also, if you have them, make sure it overlaps with the edge of your gutters.
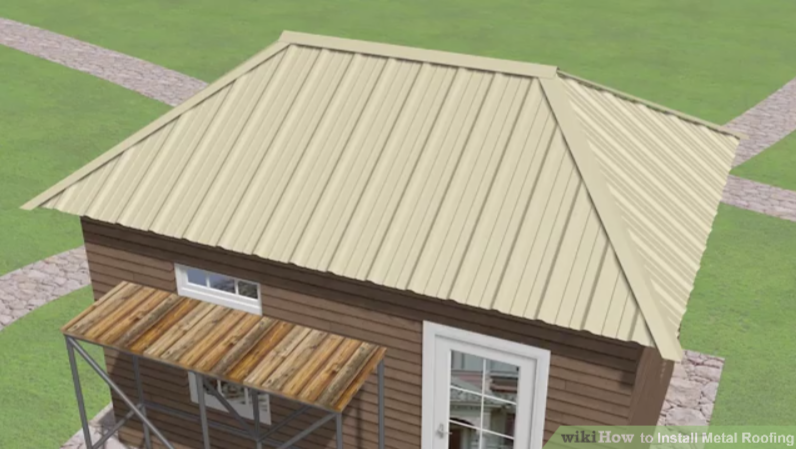
Add the Metal Panels
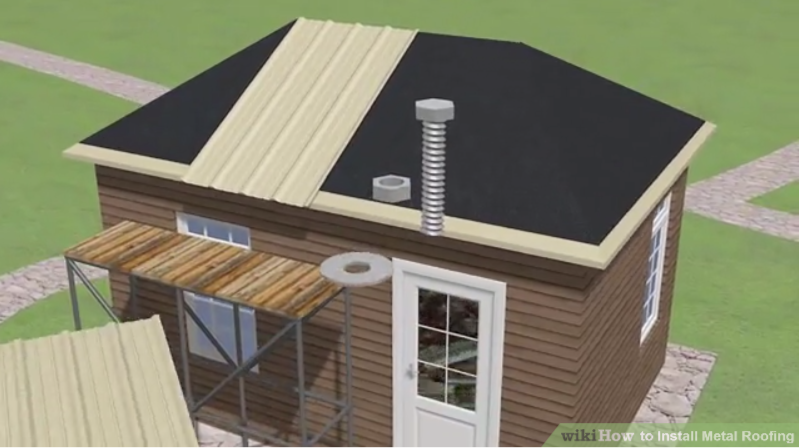
License: Creative Commons
With the edging installed, it is finally time to move on to the metal panels. When you start, always make sure to begin where the peak-to-eave distance is the longest. As you put the metal panels on the roof, you will want them to hang over the edge by at least ¾ of an inch. It should be perfectly perpendicular to the edge.
Securing the metal panels to the sheathing comes next, which you will do using neoprene washer head screws. You will want to place the screws around 12 inches apart from one another from the top to the bottom of the metal, and they should be evenly aligned.
When dealing with exposed fasteners, you need to avoid over-tightening them. You only want them to seal the site, which does not require it to be overly tight since each has a rubber grommet. However, if you tighten it too much, the rubber grommet might be displaced, which means you need to remove and replace it.
After getting one metal panel in place, you can continue to install the rest. Make sure they overlap by a minimum of one inch. The overlap might change, but you want to continue overlaying them until the entire roof is covered.
Some people also feel the need to use sealant. If you decide you need it, you can put a bead of sealant, such as 100% silicone or adhesive silicone, prior to placing the metal panel. When doing this, lay the bead toward the edge of the bottom sheet for best results.
Add the Flashing
License: Creative Commons
The metal panels are down, but there is still a bit left to do. An important part when you install metal roofing is adding flashing to protect the areas where the different sections meet. The flashing is a metal trim that is placed over the joints, and it should be used at any point where two sections meet with an angle of less than 140 degrees. It should also be used as end caps where the tops of two sides meet.
When dealing with flashing, it can be bent. In most cases, it is bent into a “V” shape to fit atop a section. It might also require using one or two rows of screws, depending on the width of the flashing.
Finish Up
After the flashing is secure, you are done. All you need to do after is make sure every part of the roof is covered and properly secured. The edges should also be smooth and finished. You now have a fantastic metal roof on your home.
With over 12 years of construction industry experience, David Bitan specializes in restoring, inspecting, maintaining, and repairing roofs for residential, industrial, and commercial properties.
How to Estimate Roofing Materials
Whether you plan to do a roofing job yourself or just want to have an idea of how much materials should cost for a job, being able to do the estimations yourself is important. It will help you avoid wasting materials and give you peace of mind that only the right amount of materials are being purchased for a job.
When it comes to the estimations, you will primarily rely on determining the area of your roof in question, then using the square footage to calculate the materials needed. Aside from the overall size, flashing and unique aspects will also need to be calculated, which you can learn more about below.
Estimating Shingles
Shingles are a common roofing choice with the benefits of being affordable and lasting quite a long time. Moreover, the material is not difficult to estimate, only requiring you to determine the square footage of the roof and calculate down to the shingles needed from there. After that, you just need to calculate a bit more for potential waste.
Determine the Square Footage
Determining the square footage of your roof can be as simple or difficult as you make it. Some roofs are complex, but so long as you break everything into manageable geometric sections, things become much easier. At that point, you just need to get the length and width of each section.
Once you have the length and width of a section, proceed to multiply them together to get the square footage of that section. After that, do the same for all sections before adding them together to get the overall square footage of your roof.
Simple gable roofs are easy to deal with, only requiring you to measure and sum the two planes of the roof. However, if there are more complicated elements, such as dormers and hips, you will need to determine the square footage for them as well.
The pitch also needs to be taken into account when you are determining the square footage since it causes the square footage of the roof to be different from that of the house. For instance, an asphalt shingle roof with a pitch of 12/12 can end up being twice as expensive as one with a pitch of 4/12.
Convert Square Footage to Squares
After determining the square footage, you will want to determine how many squares that equals. Fortunately, all you have to do to calculate squares is divide the square footage by 100. So, for a roof with a square footage of 1560 feet, the squares will be 15.6. Just make sure not to round the number at this point to avoid a problem with the end result.
Calculate the Shingles Needed
Calculating the shingles you need is an equally simple calculation. All you have to do is take the number of squares and multiply that by three. For instance, with the example of 15.6 squares, you would need 46.8 bundles of shingles. Once again, avoid rounding.
Keep in mind that the calculation of three bundles per square is for three-tab shingles, which are the most common type. If you are not using three-tab shingles, the calculations might be different.
Account for Waste
The final part of the calculation is accounting for potential waste. The usual method is adding an additional 10% of materials to the total, though hips and valleys raise that number to 15% since there will be wastage when cutting shingles to size. Either way, that would mean 51.48 or 53.82 bundles of three-tab shingles for the example above.
At this point, you can round the bundles you plan to buy, though you should always round up to be on the safe side.
Estimating Felt Underlayment
Felt underlayment (tar paper) is used to provide an additional layer of protection from the elements. To estimate how much you need, you will follow the same general steps as when you calculated how many shingles you needed before. You will start by figuring out the square footage of the area you want to cover. Then, you will convert it to squares and use that to determine how much underlayment you need.
Determine the Square Footage
The square footage needs to be determined in the same way as detailed above. You want to find the area of each section of your roof and add the totals together to get the overall square footage. If you are only replacing a part of the shingles, the job might not require new underlayment. Otherwise, it is something you must consider.
Convert Square Footage to Squares
Yet again, convert the square footage determined previously into squares. All you need to do is take the overall square footage and divide it by 100. Therefore, a roof with a square footage of 1560 feet will require 15.6 squares.
Calculate the Underlayment Needed
The next step is to use the squares to calculate how much underlayment is necessary. The felt underlayment is calculated in rolls, with type #15 being the most common underlayment. If you go with type #15, you will need one roll per four squares, meaning 3.9 rolls for 15.6 squares.
The pitch of the roof can affect how much underlayment you need. If you have a roof with a pitch greater than 4/12, a single layer is enough. Otherwise, you want to lay down two layers, meaning you should double your material estimation. There is no need to account for wastage, so just round up once you have the rolls calculated.
Estimating Everything Else
While the shingles and underlayment cover the largest area on the roof, they are not the only things you need to take into account. You will also want to consider the drip edge, roofing nails, hip and ridge cap shingles, and any other miscellaneous features like flashing.
Measure for the Drip Edge
Protecting the edge of the roof from rot is always a good idea, which is where a drip edge comes into play. A drip edge is a metal strip that goes beneath the underlayment. You can calculate how large a drip edge you need by measuring the rakes and eaves of the roof, which are the side and bottom edges. The side of the house will also need a rake edge.
Determine the Necessary Roofing Nails
Roofing nails are another necessity when there is a roofing project. An easy way to calculate when dealing with three-tab shingles is by estimating four nails per field shingle, which means you need around 320 nails for each square. In areas where there are high winds, the number increases to six nails per shingle or 480 per square. Meanwhile, starter shingles always require five nails.
That being said, there are different sizes of nails, so you will have to figure out what size you need. The nails must go 3/4 of an inch into the roof after going through the shingles and other layers. If you are not sure how many pounds or kilograms of nails to buy to get the number you need, ask someone at the hardware store.
You also need to determine how many underlayment nails to purchase. You want the nails to be 12 inches apart at the edges and 24 inches apart in the middle of each underlayment strip. That being said, they should always be one inch in size.
Estimate the Required Hip and Ridge Cap Shingles
There are two options when doing hip and ridge cap shingles. One, you can purchase hip and ridge cap shingles, which are made for that sole purpose. Alternatively, you can cut three-tab shingles to get the job done. That involves cutting them into three separate shingles, which can then be folded. If you choose to use three-tab shingles, each bundle will cover 35 feet.
Add Miscellaneous Costs
Lastly, you need to consider miscellaneous costs, which include everything from metal flashing to shipping costs. An example is venting, which is critical for the integrity of the roof. If you live in a cold area that often experiences snow or ice, you might also want an ice and water barrier.
Every roof and home is different, so consider every part of your roof and make sure you do not miss anything.
As always, call Bumble Roofing if you need help costing out a roofing project.
With over 12 years of construction industry experience, David Bitan specializes in restoring, inspecting, maintaining, and repairing roofs for residential, industrial, and commercial properties.

How to Tarp a Roof
There is nothing worse than a leaking roof. It not only causes water damage to your home, but it makes you feel nervous and insecure in the place you are supposed to be the most comfortable. Tarping your roof is a good measure to protect your home until you can get a permanent fix in place. Moreover, it can provide protection for around three months, giving you the time and peace of mind you need.
There are three basic steps when you are tarping your roof. The first is to figure out how much damage has been done. Once you have done that, you can start positioning, getting everything unrolled and in place. Finally, you will secure it to your roof, finishing up the process until you can take care of the repairs.
Figure Out the Damage
License: Creative Commons
Step one, figuring out the damage done to the roof. This step is important for a few reasons. One, it informs you of the right tarp for your project. Secondly, you can use the information you get here when you are planning or contacting someone for the permanent fix. It starts with finding the source.
Find the Source of Damage
In order to figure out where the damage occurred, you will need to get on your roof. It might require a ladder, or you might have direct access. Either way, get up there and take a look, remaining on the ladder if you are not comfortable standing on top. If you have tiles, look for damage. You can also search for debris.
Keep in mind that there might be multiple points of damage. You might also have luck searching for damage inside, which can be detected by water stains or debris inside the house.
Take Precise Measurements
Proper measurements are important. You will want to try to go up and take a look if you can, kneeling beside the damage. Then use a tape measure to get exact measurements everywhere you see damage. Additionally, get some measurements of the roof as a whole since they will come in handy later.
Get Video and Photo Evidence
It does not matter what you use to do it — a phone will work — but get some evidence of the damage. Not only will it come in handy if you need to describe the damage to someone, but it will help with home insurance and making a plan. Moreover, once you have the tarp down, you will not have easy access to the damage.
Buy the Tarp
The photos and measurements will come in handy here. You want to get a tarp that is the right size for the damage. On the other hand, without proper images or measurements, you will have a difficult time finding one that is just the right size.
A good rule of thumb is to purchase a larger tarp than you need. That is especially important if you do not have precise measurements to estimate. You can always ask for help if you are in doubt.
Put Safety First
Anything that involves being on a roof can be perilous, which is why many people trust professionals to do roofing work. When doing it yourself, the right safety equipment is necessary to minimize the danger. Consider the following items when preparing to tarp your roof:
- Boots or roofing shoes
- Protective gloves
- Stable ladder
- Safety glasses
- Hardhat or helmet
When it comes to roofing shoes or boots, you want to buy a pair with soft soles. That prevents damage from being done to the roof as you walk on it. Additionally, you might want to consider a vest, preferably one that makes you easier to see. When you have everything you need, it is time to set up the tarp.
Get the Tarp In Place
The next step is to get the tarp in place. That probably means finding some helpers since it will be an arduous task alone. Friends or family work fine, so long as everyone is careful. The more important aspect is to have an extra pair of hands to help with the process, which includes clearing the area, unrolling the tarp, and laying it out flat.
If you decide to go about things alone, try not to do it when you are home alone. If it is an absolute must, take further safety precautions in case of an emergency.
Clearing Away Debris
The tarp needs to go down flat, which means you need to clear the area. That includes branches, leaves, and anything else that might get in the way. You can do this with a brush. It is also a good idea to do so on a dry day since that will make things go more smoothly and increase safety.
If the damage was caused by a fallen limb, it might be heavy and difficult to move. Trying to lift it alone might cause you to lose your balance or damage the roof further. So, if that is the case, find someone to help.
Unroll the Tarp
It might sound like a simple step, but it is not something you want to take lightly. You will want to unroll the tarp on top of the roof. Moreover, make sure that you are careful since it can be difficult to deal with, especially if there is a lot of wind. While the actual unrolling or unfolding, depending on how it is gathered, is simple, do not force anything. Find a way to do it so that it unfolds naturally to make things easier and safer.
Place the Tarp Flatly on the Roof
To ensure the tarp is in a good position, you will want to get it down flatly on the surface of the roof. You also want to lay it down in such a way that around four or five feet are on the sloped portion of each side of the roof (peak). The remaining tarp should hang from the lower border overhanging the wall (eave).
When you are placing the tarp, it is best to go with a dry day to avoid any water being trapped between it and the roof. You also want to avoid windy days if possible and never risk putting it in place during a storm. Additionally, never walk on top of it.
Making Things Secure
Placing the tarp across the damaged roofing is a great start, but securing it in place is the most important step. Moreover, to do it properly, there is quite a lot of work involved. For starters, you need the right equipment, which will be discussed in each of the steps below.
Secure 2×4 Boards to the Tarp
Boards are a great way to secure things, and you will need four of them. The boards will be secured to the peak ends of the tarp. Here are the steps you can follow to properly secure the boards:
- Place a board under a peak end.
- Keep two feet sticking out on both sides.
- Attach the board and tarp using a hammer and cap nails, hitting them through the tarp and into the wood below.
Once you have attached one peak end, move on and follow the same steps for each of the other three peak ends.
Wrap the Tarp Around the Boards
Just nailing them together is not enough to properly secure things. You will want to take things to the next level by wrapping the tarp around the board until it is covering every side. The best way to do this is picking it up while wearing gloves and turning it counter-clockwise. Once done, place it back down and do the same for the other boards.
Secure Boards and Tarp to the Roof with Screws
You will need a drill and two-inch screws for this step. What you want to do is pick six or so spaces on each board, with equal spacing. After that, drill through the tarp and board and into the roof, securing the board and tarp to the roof. Do the same for each board, and you will be closer to securing the tarp to withstand harsh weather.
Secure More 2×4 Boards Perpendicularly with Screws
You want to get four more boards, which you will place perpendicular to the boards already secured with screws. The difference here is that you want the boards to go on top of the tarp, with the short ends resting against the long side of the secured boards.
Once you have all the boards in place, follow the same procedure to screw them in. Remember, equal spacing. Also, it should go through every layer, from board to tarp to roof.
Use Additional 2×4 Boards with the Overhanging Tarp
The peak is firmly in place, but the overhanging portion of the tarp is still flapping in the wind. To fix that, you will use two more boards. To start, pull the overhanging tarp to the roof to give yourself a stable place to work. After, place the boards, leaving a few feet sticking out like before, and nail them together.
Once the tarp is secured to the board, let it hang over the eave. Once you have a good position, likely using a ladder, roll the tarp so it is wrapping the boards and place it firmly against the base of the eave. You will want to continue to wrap the boards until there is no slack. At that point, use your two-inch screws to connect the tarp and boards to the wall.
Use Your Judgment to Add Boards
While the above will cover many situations, you might need to add additional boards. The boards that attach the tarp to the roof are called “anchor boards,” and if you feel they are not enough to secure things properly, lay as many as you need and secure them with screws.
Lastly, make sure you do not leave the damage unattended for too long. While a tarp will protect you for months, it is not a permanent fix.

How to Apply Rolled Roofing
Rolled roofing is a type of roofing that has seen a rise in popularity recently, with one of the major benefits being that it is inexpensive compared to shingles and many other roofing materials. Moreover, it is incredibly easy to install on your roof, meaning you will not require a pro to do the work for you.
If you follow the instructions, you will only need a few hours to install rolled roofing. That includes making thorough preparations, such as measuring the roof and getting your materials ready. It also means installing the roofing, starting with marking guidelines with chalk, placing each layer, and using cement and nails as needed.
You will find everything you need to know below. Just make sure to be careful, just like you should with any type of roofing work.

Make Preparations
Proper preparation is important to get the job done right. Fortunately, there is not much you need to do when installing rolled roofing. You will start by getting measurements, followed by purchasing your materials and setting up safety precautions. Finally, you will clean the roof and lay out your materials for the job ahead.
Measure the Roof
Although rolled roofing is relatively inexpensive, you do not want to overbuy material for no reason. That means you need to take accurate measurements of your roof to determine how much material you need.
You will need a tape measure for this step, which you will use to measure the length and width of each section of your roof. You can then multiply those values to get the area, adding that to the area of all the other sections to get a proper estimate.
If you are dealing with a square or rectangular roof, you do not have to worry about going by section and can calculate the area directly. Otherwise, take your time and go bit by bit. Also, when purchasing materials, get around 10% more to account for wastage.
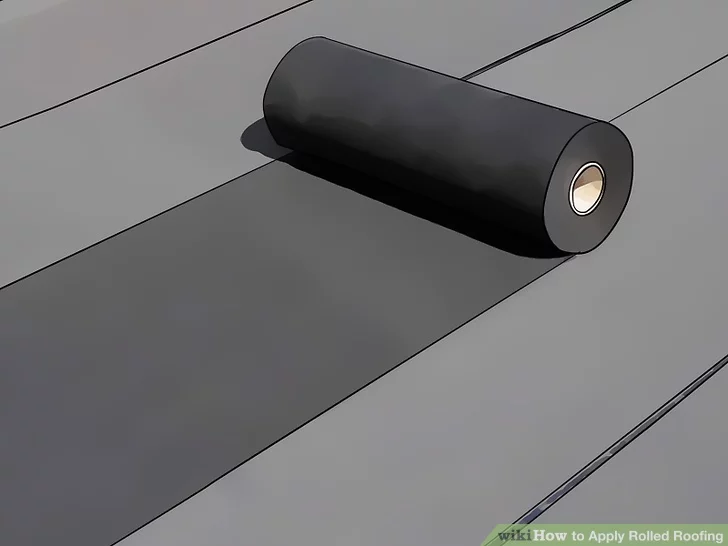
Purchase Your Roofing Material
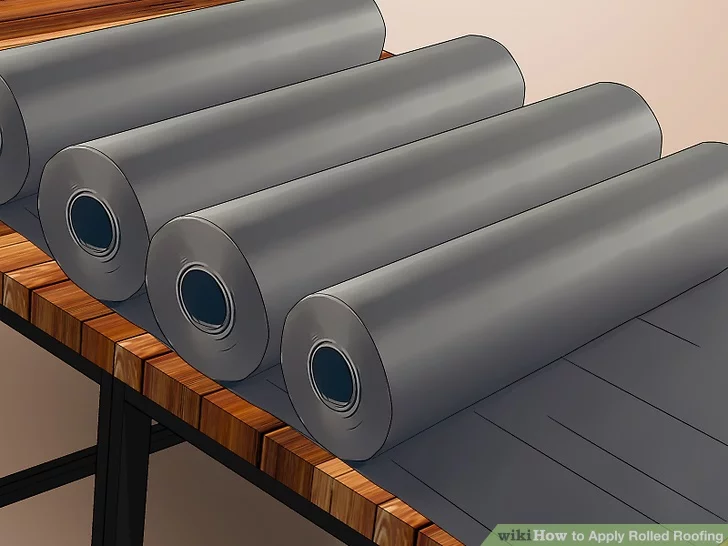
Now that you know how much material you need, including the extra, you can make a purchase. You can buy rolled roofing at hardware stores and building supplies stores, which will sell it in rolls. If you find them difficult to carry, feel free to purchase multiple smaller rolls since you will be cutting the material to fit anyway.
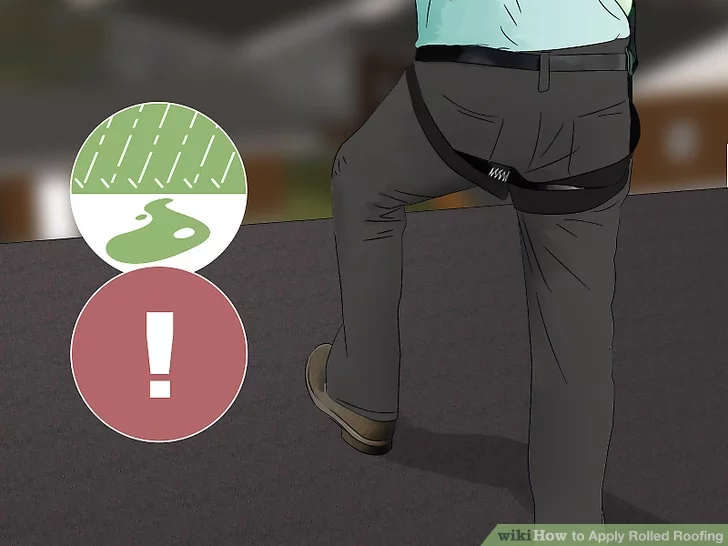
Set Up Safety Precautions
Safety is always important, especially with roofing work. It becomes even more important if you have a steep roof or lack experience. That is why you might want to consider having someone with you while you work.
You should also avoid getting on a roof when it has rained or if there are signs of rain. Roofs become slippery, which makes an already dangerous task even riskier. Moreover, even if it is dry, be wary of the slope and wear the proper shoes with grips on the soles.
Clean the Roof
You will want to make sure there is no old roofing remaining before cleaning, but once that is taken care of, you can start getting everything else out of the way. That means getting rid of dirt, grime, or anything else, which is often accomplished with a stiff brush or a leaf blower. Make sure to clear your gutters as well, assuming you have them.
Something else you might want to consider is using a hose after you have cleaned the roof. However, if you decide to hose down the roof, make sure you do it from the ground and do not go up to install the roofing until it is dry.
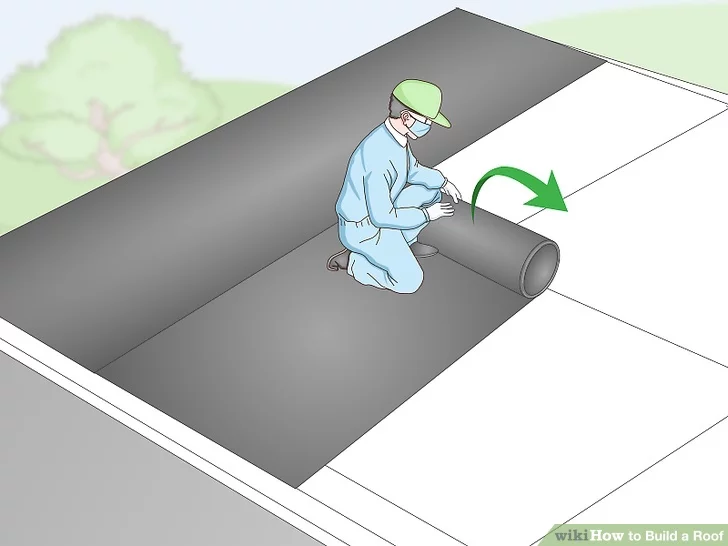
Lay Out the Materials
Laying out your materials is a useful step that helps you keep things organized and ready to go. Start by rolling out the roofing sheets and laying them flat, placing bricks at the corners to hold them down and reduce resistance later.
You can cut the roofing into pieces between 12 and 18 feet, which you can then lay out flat in the yard. It is best if you can let them flatten in the sun for the day, but if it is cold, you will want to move the roofing into the garage or somewhere warmer. That is because cold weather damages roofing.
Install the Roofing
The installation of rolled roofing is relatively simple as long as you follow a few easy steps and use the right materials. And if you do it right, you come out with a fantastic roof that will last anywhere between eight to ten years. The basic steps involved in installation are marking chalk lines to serve as guidelines, applying roof cement to secure the roofing, and placing and cutting the rolled roofing to fit your roof.
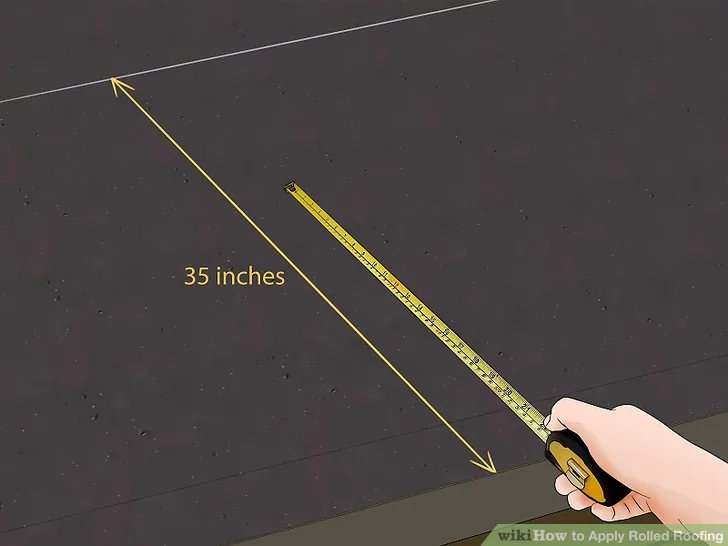
Mark a Line In Chalk
The first step is marking a chalk line, which will signify where you want the first layer of the rolled roofing to end. Most roofers use a measurement of 35 inches from the bottom of the roof for the first layer, so you should do the same. Once you have marked that point, draw a straight line across the roof.
When you are marking your chalk line, do not use the eaves as your guide since they will not always be at the same height all the way across the roof.
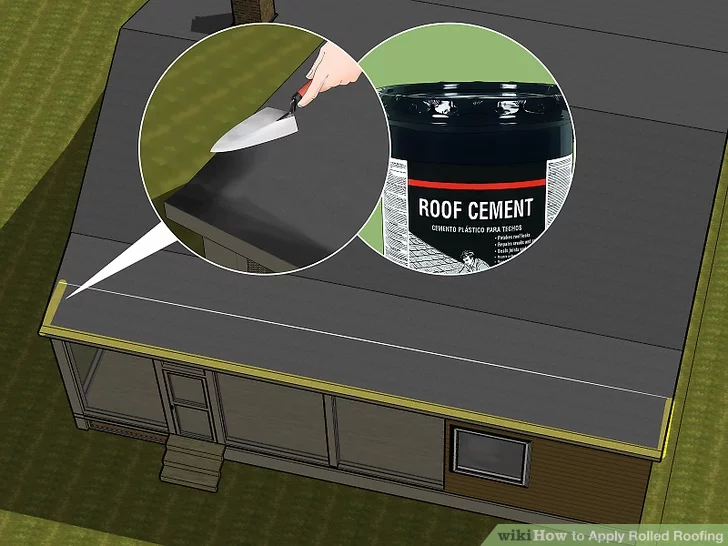
Apply Roofing Cement
After your line is in place, grab roofing cement and a trowel. Then, scoop and spread the cement around the edges of the roof, keeping it around 1/8 to 1/4 of an inch thick. Make sure to apply it in stages, starting at the bottom and using the chalk lines as borders for each section.
You do not have to get a special type of cement and can use what you can find at a hardware store. However, you should read the instructions on the side before you begin working. Also, make sure to wear gloves when using roofing cement.
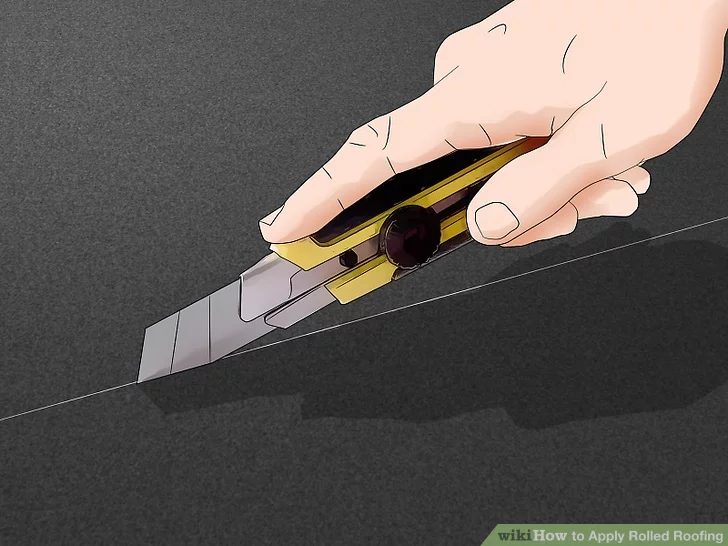
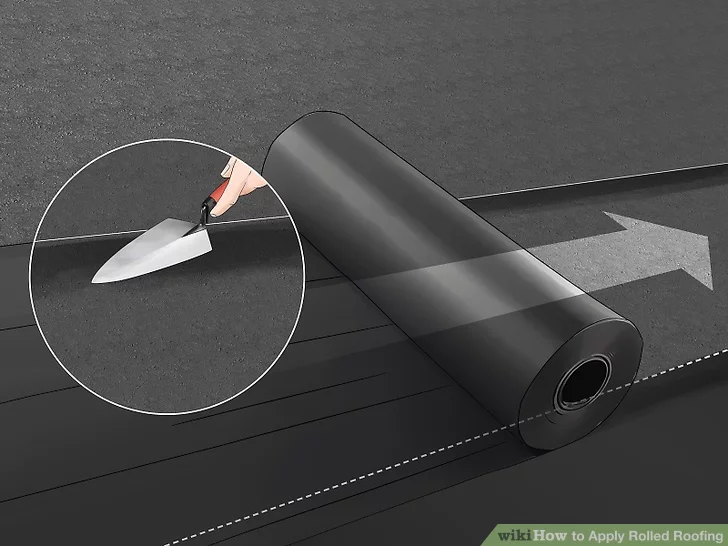
Cut the Roofing Material
Rolled roofing is easy to install for a few reasons, including the fact that you can easily cut it to the size you need. Therefore, make sure you cut it so that it reaches the chalk line and goes from one side of the roof to the other. To do this, you can use a utility knife, applying as much pressure as needed to get through the material.
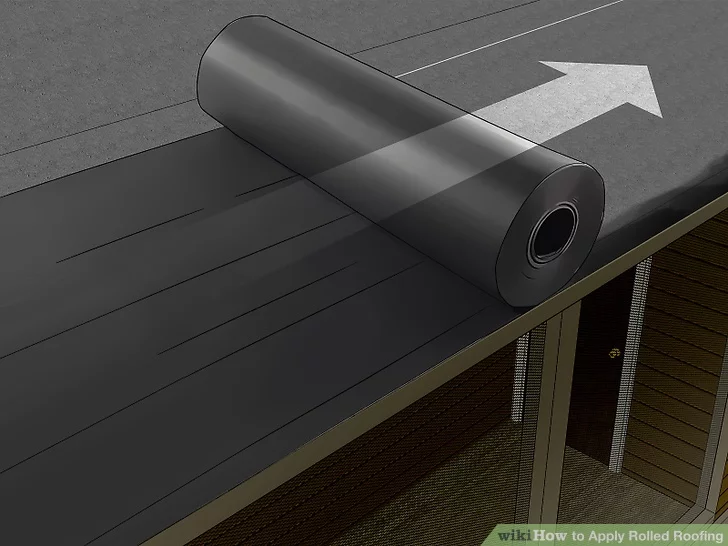
Place the First Layer
Now that the cement is down and the rolled roofing is cut to size, you want to place your first layer. When placing it, stretch the roofing to remove any wrinkles or creases, then push it onto the wet cement to properly secure it into place. And remember, it should only go up to the chalk line.
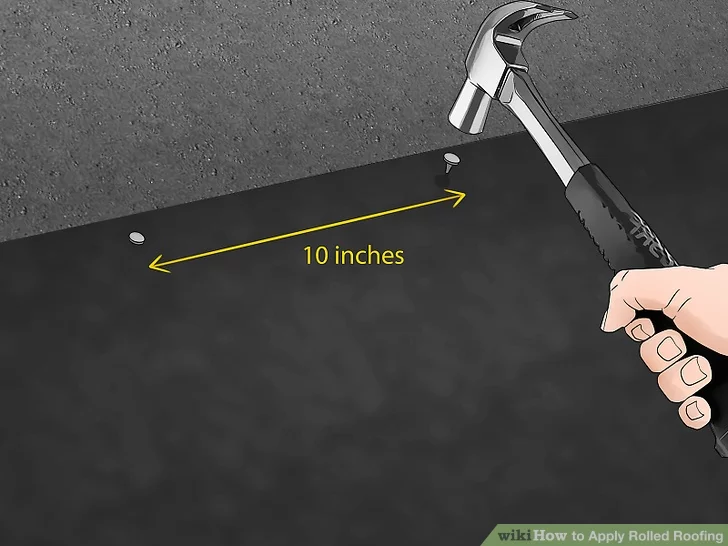
Secure the Rolled Roofing
While the roofing cement will help secure it temporarily, nails ensure it is firmly in place. Use a powerful hammer and 1-inch roofing nails, hammering them into the roof at 10-inch intervals. They should all be hammered well into the roof so that no part is sticking up to avoid problems as you place additional layers.
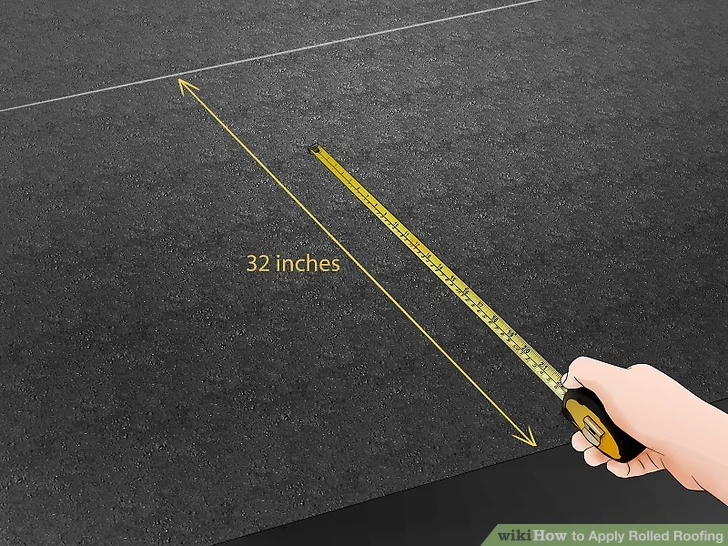
Mark a New Line In Chalk
Once you place a layer down, you always want to add a new chalk line. However, after the initial line, you only want to go up 32 inches. The reason for the shorter distance is that you are going to layer the new rolled roofing over the previous layer. When doing this, use a tape measure for precision, then draw a line across the roof.
Apply Cement and Secure Additional Layers
Take the trowel and cement and add more roofing cement, applying it below the second chalk line. After you have it across the roof, you can start to add another layer of rolled roofing above the first. Just make sure to overlap it with the previous layer by about six inches. You also want to nail the layers together.
The process will be repeated until you cover the entirety of the roof. You will apply the roofing cement, overlap the layers after the first, and secure the roofing material with 1-inch roofing nails.
Cover the Remaining Nails With Cement
While the nails secure the roofing in place, they also need a layer of protection, which comes in the form of your roofing cement. So, once you have all of the rolled roofing installed, take your cement and cover your nails with it to seal the nails into the roofing.

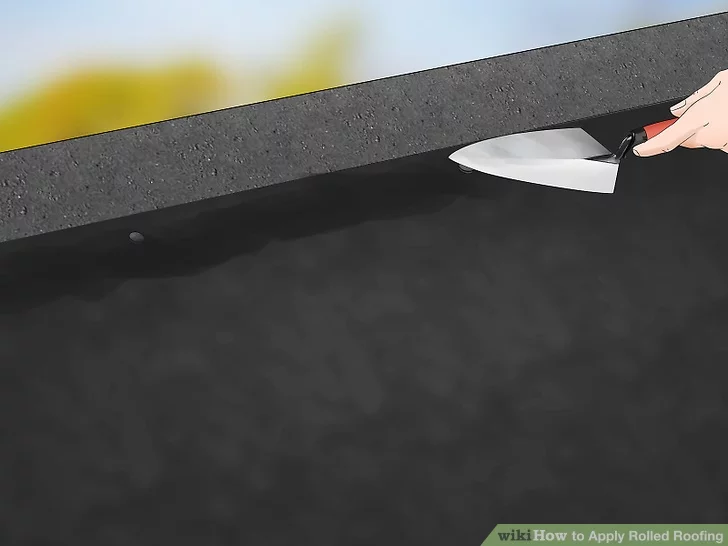
Trim and Seal the Edges
Another necessary step is trimming and sealing the edges, which involves a utility knife and more roofing cement. You will take the knife and remove excess material, paying particular attention to corners and edges. When you finish, try lifting them. If you can, seal the edges in place with your roofing cement.
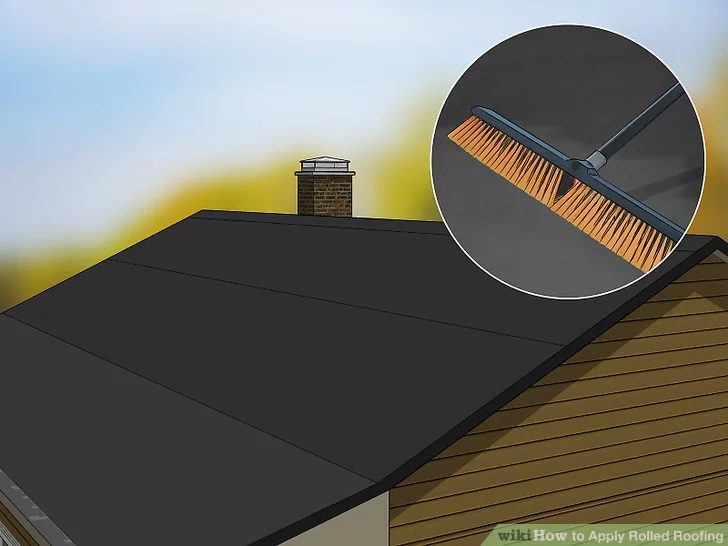
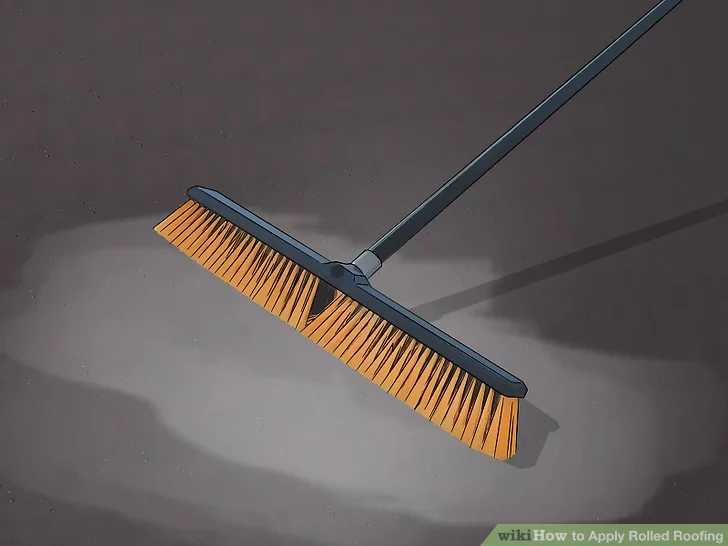
Clean the Roof
It is always a good idea to finish off any roofing project by cleaning any leftover dirt or debris. With a rolled roof, you can do this with a stiff brush, though there really should not be much dirt on the roof. Once you are sure everything is tidy, you are done.
With over 12 years of construction industry experience, David Bitan specializes in restoring, inspecting, maintaining, and repairing roofs for residential, industrial, and commercial properties.
Claim Your Free Roof Inspection Today.
Roof issues are a buzzkill, but not with Bumble Roofing on your side.
Fill out the form, and our expert team will assess the condition of your roof to advise on the best course of action to maintain the health and longevity of your roof.